Showing posts with label decorating. Show all posts

Friday, December 19, 2025

Homestead Happenings


Welcome to Homestead Happenings!
We've had some bitterly cold weather in the last couple of weeks,
but it looks like things are warming up.
Next week's forecast is looking downright mild!
Here are some things happening inside and
outside on our Piedmont homestead.


Some of the crops are a bit worse for wear.
The lemon balm finally succumbed to the freeze,
and the kale and broccoli aren't looking too good.
With the rain we got yesterday,
I'm hoping some of it will perk up.


The cabbage seems to have survived,
and I am still hoping for a harvest
sometime this winter.


Of course, it doesn't help that we have infiltrators
who help themselves to whatever they can find
under cover.
Matilda is one smart chook,
and has now taught her sisters to look for goodies
underneath the row covers.


We've been using the new Omlet waterers 
for a couple of weeks now.
I have to say, there are so many wonderful features
with these, including the "window" on the side
to indicate when they are running low.
I've been pleased with how well they keep the water clean,
as the top is completely closed.


However, when our temps reached 28 overnight,
the cups we had initially installed did freeze.
I prefer using the cups, as it seems to be
a more natural way for the chooks to drink.
We have since replaced them with the 
optional nipple waterers.
We'll probably go back to the cups in warmer weather.


We did a minimal amount of decorating outside,
including adding lights to the chicken runs.
After all, why shouldn't the girls enjoy some of the festivity?


Inside, we keep things very simple.
Our new curtains were added to the living room,
and I really enjoy the farm print.
We had these made by Stephanie at SewManyLinens on Etsy,
and plan to order another for our office window.
You can find her website here.


The curtains that used to hang in the living room
have been repurposed in our "spa" room that we did a
minor makeover on earlier in the year.
They hang just beautifully as is,
and I feel good being able to use them elsewhere.


Our refrigerator always gets the snowman 
treatment when the colder weather hits.
It's so easy to do, having a white fridge.
He always cheers me when I head for the kitchen.


This year, our mantle has the simplest of displays,
simply using what we have around the house
and adding tiny fairy lights.
The white illumination just adds a touch of magic to everything!


The annual Madeleine baking has been done
and they are already being enjoyed by my farmer friends
in Florida.
One more big batch to go for sister
and her peeps.


The Fresh Milled Flour is being incorporated into my
weekly baking routine now.
This bread may not look too pretty, (I'm still learning),
but it's absolutely my favorite sandwich/toasting bread so far.
Recipes may start showing up here in the new year.
The health benefits have been amazing!


This week, chocolate chip cookies were made,
using FMF and coconut sugar instead of the white stuff.
Coconut sugar and maple syrup do not seem to have
a negative effect on my health,
and so that is what I choose to use as a sweetener.
Recently, a bag of date sugar was purchased, and
that will be tried as well in the near future.
These cookies were soft, flavorful, and not too sweet.


Creature comforts are so centering.
The days are full, but not too busy,
and there is always time to slow down
and take in a holiday movie without leaving home.
Here's hoping you are making great memories
with those you love most.
~"God bless us, everyone!"

Thursday, December 13, 2018

Zero Waste Christmas Craft


Remember making snowflakes in elementary school?
It's such a simple idea,
but wow, what an impact they can make!
They are easy, quick and quite relaxing to create.
It took a bit of research to get the process down pat,
but after a while, 
I could see them improving with each attempt.
The best part of this craft is that 
it produces very little to no waste.


The only supplies needed are 
paper, scissors and your imagination.
This is a fantastic project to do with kids,
especially a big group!


 Two different sizes of triangle pieces were made.
By simply folding a standard piece of computer paper
so that the bottom right corner is brought up to the left side edge and creased,
it forms a triangle.  The excess is cut off (we used the extra pieces for scrap paper.)
For the smaller triangles,
fold a standard sized piece of computer paper in half width-wise,
and follow the same process, creating the triangle.


 Once you have the triangles completed,
the magic begins!


 Regardless of size, fold the triangle over onto itself,
so that you have a smaller version of the original triangle.


 It should look like this.


Then open up the fold,
so that your triangle has the point facing down.


 Take the right side of the triangle
and fold it so that the outside edge
lines up with the center crease.


Crease it well, so that it stays together
and flip it so that the point is facing up,


like this.
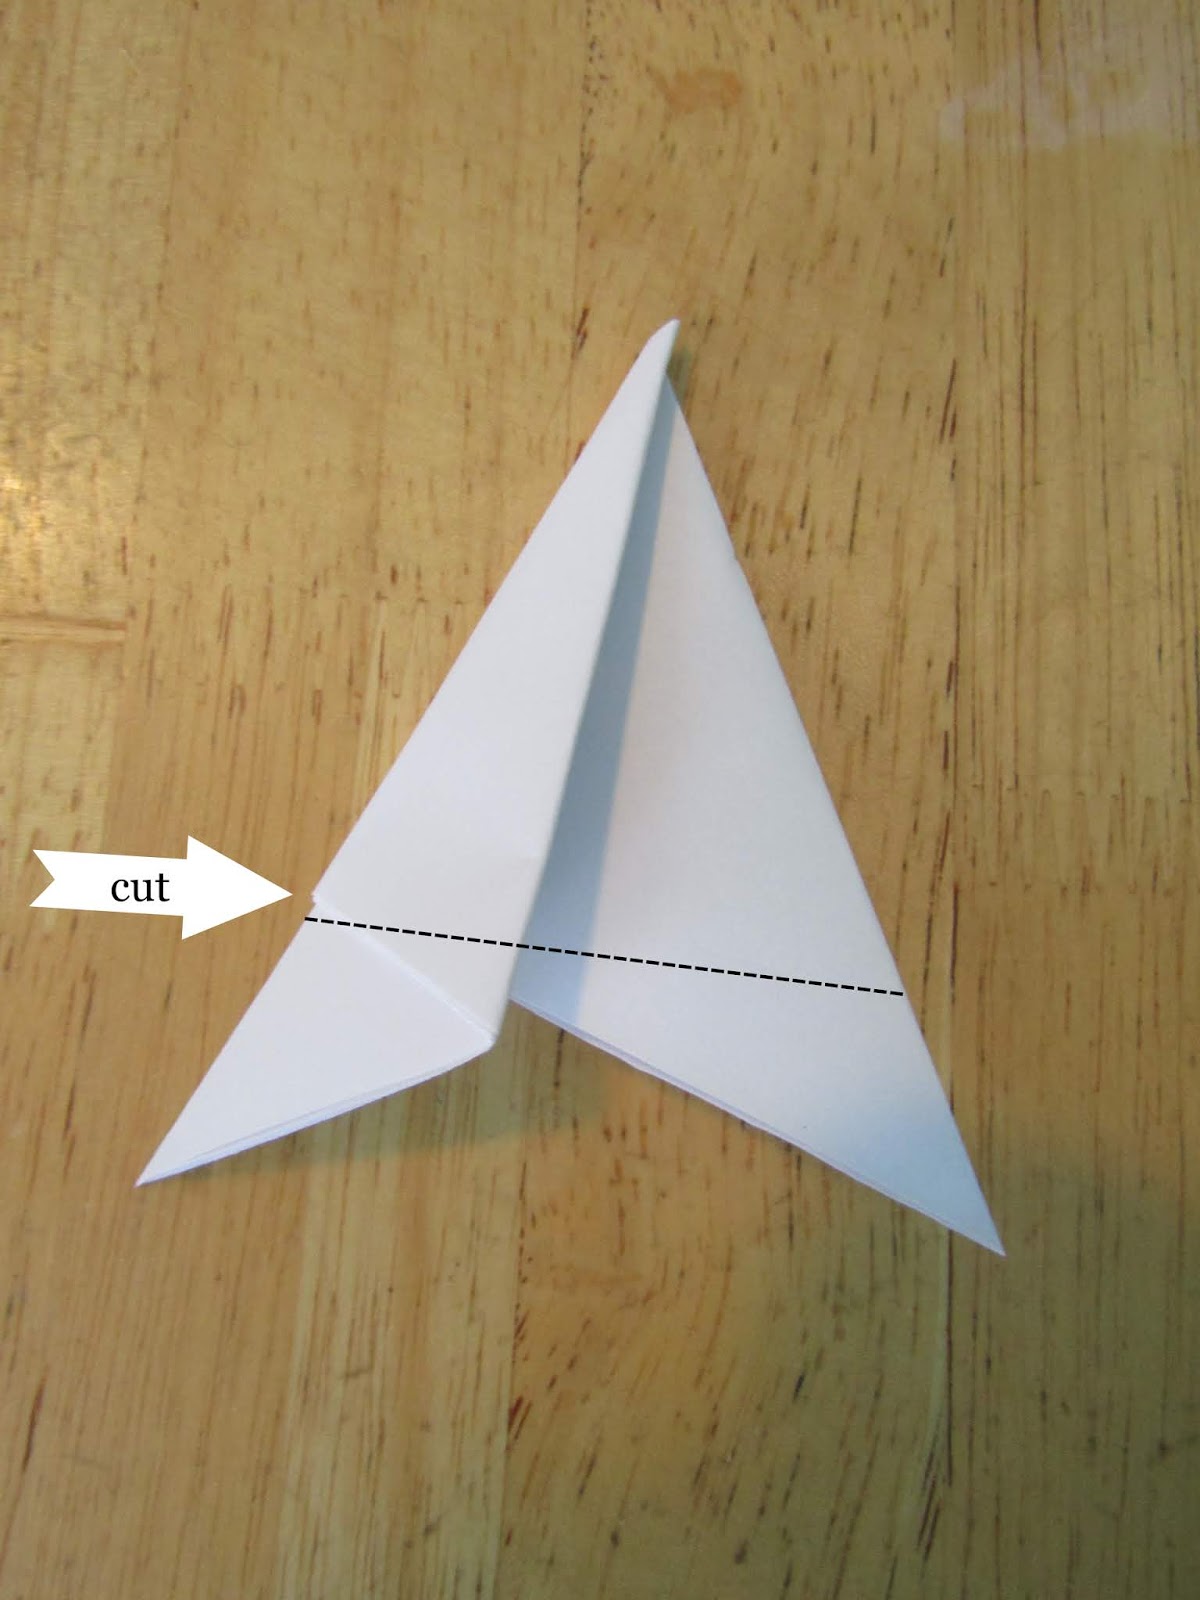
Someone said that it should look like the Star Trek logo.


Cut off the bottom part of the new shape,
so that the bottom edge is completely straight.


Even these tiny scraps will get used-I'll tell you how.


Let the design begin!
There are a few ways to do this part,
but what you need to remember is not to cut all the way through the thinner side.
If you do, your final product will be in pieces, instead of one stunning snowflake.
I experimented with many shapes and I found the designs I liked best
were made by cutting from the bottom up into the center.
The more detail you add, the "flakier" your finished product will be.

from this

 Here's one design that I did,
and once unfolded, you'll see the results.
This part is free-form, basically just let your imagination go wild!

to this

almost there

eh, voila!


The feeling of joy comes over you
as you unfold each masterpiece,
never knowing what it will look like until the very last moment.
It really is magical!


And just like real snowflakes,
each one is absolutely unique.
This is a no or low waste project, 
depending on what you do with them.
We created one feature wall in our living room
and covered it from floor to ceiling!
All scraps will be either used for scratch paper
or used in our worm bin as bedding.
The snowflakes themselves make a great addition to any gift
and can be reused each year until they fall apart.
At that time, they can be composted or used in the worm bin.

It was so much fun reliving childhood memories
and relearning a simple and fun craft.

What are some of your favorite holiday crafts?


Thursday, July 26, 2018

HOMEmade


Repurposing is a way of life.
We make do with what we have
and what we don't have,
we try to make.


This picture frame was found at our local ReStore,
complete with hanging hardware.
It was painted a creamy white 
and then slightly sanded for a distressed look.


The chicken wire had been sitting around for a while,
just waiting for a new life.
This roll was acquired (for free) several months ago,
along with a number of larger-sized wire rolls.
The chicken wire was attached to the frame
using our electric staple gun.


The Scrabble letters were found at one of our local shops downtown.
They can be used for so many things,
and because I love the game,
it makes it even more appropriate in this application.
The scrap of beadboard was leftover from our 
"Bad to the Bone Beadboard" project
that we completed last summer shortly after moving in.


The letters were originally glued onto the painted beadboard with Liquid Nails,
but because I had used craft paint, it didn't stick.
Fortunately, our resident handyman has a bin with dozens of screws.
It didn't take me long to raid it find just what I needed.
The screws were a scant 1/4" shorter than the tiles,
to ensure that they wouldn't come through the other side.


This handy-dandy vise assisted me with holding the frame still
as I attached the eyehooks.
The towel was placed to prevent damaging the painted finish.


For a little over a dollar,
these small eye hooks were purchased
and there will be a few extra for future projects.


Using a tape measure,


the hooks were placed about 6 inches in from each side.


Some narrow-gage wire was used to hang the beadboard
from the eyehooks.


Ta-da!
This was a pretty quick project,
and I'm so glad we now have original artwork
to make our home more personalized.


The white frame really stands out against the teal background.
Combining so many things I love,
the rural feel of the chickenwire, the modern and fresh look of the beadboard,
and the Scrabble tiles, 
really customizes this piece.
The kicker?
It cost me a fraction of what I would have paid
had I bought it somewhere.

What have you repurposed lately?

Shared on:

Amazing Me Mondays


Featured at the This Is How We Roll Link Party