Showing posts with label Fertilizing. Show all posts

Friday, April 24, 2026

Homestead Happenings


Well, hello there!
Welcome back to Homestead Happenings,
where we share what's going on here on our Piedmont property.
New life abounds, with the latest family of bluebirds
taking shelter in one of our birdhouses.
These parents are no doubt getting very little sleep,
having six mouths to feed!
 

The lettuce beds are feeding me well these days,
with more being sown this week for a continued harvest.
Watering has been a ritual every few days,
as we are in an extreme drought situation.
This weekend we should see some much needed precipitation.


The kale and lettuce make up my daily
(sometimes twice daily) salads.
There is nothing quite as satisfying
as creating a meal using food you've grown.
The fresh flavor is like nothing else.


The outer leaves are picked so that the
heart of the leaves continue to grow,
creating a cut-and-come again salad bar.
Of course, some of the bounty is shared with our chooks.
They love greens of any kind!


I noticed flowers on the elderberry this week.
This year will be the first time I attempt to
make syrup, which many folks swear
has medicinal properties.
The chooks can also be found hopping up
to reach the berries for a midday snack.


There are blueberries forming on our plants!
I had all but given up on these bushes,
and had planned to replace them,
but lo and behold, they came back to life!
Another treat I hope to enjoy before the 
chooks and squirrels help themselves!


With one bed of potatoes growing quite vigorously,
a second bed was started.
(The netting is to deter critters from digging in the bed.)
This variety is Kennebec,
which I've never grown before.
You can find out more about them here.


All crops were fertilized yesterday.
Fish emulsion is applied by hand
using 2 Tablespoons per gallon of water.
A five-gallon bucket allows me to mix up
all that is needed.


New seeds were sown using the soil block method.
If you ever played with mud pies when you were young,
you'd love this technique!
Conventionally, soilless potting mix is used to start seeds,
but I only had standard potting mix.
Perlite and vermiculite were added for better drainage.
Sufficient moisture is key here,
in order for the blocks to stay together once discharged from the mold.
It was surprising to find how easy it was to get the balance right!


Both crops and flowers were sown, labeled,
and watered in before placing in a safe space
away from curious critters.
It was so much fun that more blocks will be created later today.
After all, how can one pass up the opportunity to feel like a kid again?


So much of the garden is filling in,
and it does my heart good to see that the effort
I've put forth in the past few years 
is paying off.
It's so centering to sit out here with the chooks roaming,
reading a good book or simply enjoying
the wonder of the nature around me.
What a blessing.


This baptisia is one of my favorite sights in the front flower bed.
It's taken 3 years to bloom, but so worth the wait.
The magic of perennials never ceases to amaze me.


This clematis, which resides on the north side of the garden,
was also slow in getting established.
I look forward to seeing it bloom every year,
and am grateful when it surprises me
by being one of the first pops of color in the garden.


Along with winter sowing and soil blocks,
I thought I would try my hand at sprouting some seeds indoors.
Simply using a damp paper towel,
these fresh seeds from Sow True in Asheville,
didn't disappoint after just a few days.
I never tire of the magic of seeds.


Our new babies are two weeks old,
and growing like nobody's business!
They have already figured out how to hop up on 
the warming tray.
They are so much fun, and as you may be able to tell,
they are non-stop!
They all look lively and well,
and we are handling them every day.


Our older gals are enjoying their foraging time,
with plenty of grass, clover and bugs to savor.
I'm so grateful to have these souls in my life.
Life is just better with chickens.

I'd love to hear how spring is treating you!

Tuesday, June 2, 2020

New Worm Bin


A couple of years ago,
we showed how we fashioned a homemade worm bin.
You can visit that post here.
We still have that one,
but there were a few things that made it difficult to harvest the castings,
which is the main reason we started our bin.
Mostly, the totes would get very heavy,
laden with our black treasure.
It required me to sift through the bin for worms,
so that I could gather the castings for the garden.
Doable, but not desirable.


Enter the Worm Factory.
This kit comes complete with bin, multiple trays,
coir, pumice, and even shredded newspaper.
Everything but the worms are included, as well as an instruction book
to get you started.


The pumice aids in drainage and aeration,
so that the bin stays moist, but not soppy.


 Coir, which is ground coconut fiber, 
acts a bedding material.
This is soaked in water and becomes fluffy before being added to the bins.
 (I haven't figured out yet what the scraper is for,
but it's included in the kit.)


 The instruction manual details step-by-step
how to put the wormery together,
as well as tips on how to harvest castings.


 To start the first tray (where the worms will be),
a layer of dry newspaper was placed on the bottom.


In order to prepare the bin for worms,
the coir was mixed with some potting soil, shredded paper
and pumice and added to the bottom most tray.


The soil mixture was added on top of the dry newspaper.
At this point, food scraps can be added to one corner of the tray.
I used chopped lettuce, kale and other cuttings from meal prep.
When making a salad or using greens (their favorite),
I chop them into small bits and place them in a freezer bag
until they are needed.
The worms get fed about once a week or so.


 After adding the worms, place a layer of wet newspaper on top.
This will keep the tray moist and dark, 
just the way they like it.
I used the two empty trays here to store some shredded paper
for when I'm ready to start the next layer.
Extra trays can be added, up to a total of five.
The spout is designed to keep excess moisture out of the bin,
as well as allowing you to create casting tea with the contents.


One peek into the bottom tray two weeks after starting this tray,
made me feel that I was on the right track.
The next tray will be added this week,
and the worms are supposed to migrate to the next tray up
and start the whole process over again.
There has been no trouble thus far with mess or odor,
but I think I would still rather have them outside on the back deck
(in the shade) rather than in the house.


The lid of the worm factory gives all the necessary information,
to make it easy to maintain your population.
You'll notice in the lower right-hand corner
that this wormery is made in the USA.
Another plus, in my opinion.

Overall, we are pretty happy with this simple worm bin.
It seems like it will save me both time and energy
and create castings galore.

Do you know what a group of worms is called?

(A clew.)


Thursday, August 1, 2019

Worm Hotel


A little over a year ago,
we fashioned a worm bin using a couple of storage containers.
You can find that post here.
I've got mixed feelings about it.
It's definitely a cheap and easy way to create castings for the garden.
Those critters do nothing but eat and poop,
so within a couple of months,
you've got plenty of castings to add to the garden.

The one thing that doesn't appeal to me
is that it's hard to remove the castings
without taking out a lot of the worms.
My friend Jannah has a store-bought worm bin
that works great and is much tidier for harvesting the castings.
I'm still thinking about getting one,
but at over $100, I thought I'd try a different way of worm farming first.


This is a take on an idea I used in Florida,
but on a bigger scale.
It's a worm hotel and it's used directly in the garden.
I cut a nine foot long PVC pipe into 3-foot pieces,
using a jigsaw.


Next, using a drill with a large bit,
holes were cut around the bottoms of the pipes.


I placed them in various beds,
being sure to keep the holes under the soil.
This one is in the white sweet potato raised bed.
The gist of it is that food scraps are added to the top of the pipe,
where worms can enter from the drilled holes near the bottom.
Since the worms are all about finding goodies to eat,
they remain in the bed, enriching the soil with their castings.


This gives us yet another way to use up coffee grounds, eggshells, 
food scraps and paper.
As long as they continue to be fed,
these workers continue to poop and feed the soil,
thus feeding your crops.
The worms check into the hotel and leave behind their gifts.


To ensure the interior stays dry,
I covered the opening with an old coffee can 
and placed a brick on top to keep other busybodies out.
I'm looking forward to seeing how it works.
One of my goals as a gardener is to eliminate the need for fertilizer,
and this may just be one way to reach that goal.

Do you use worm castings in your garden?


Friday, March 23, 2018

Garden Friday


Welcome back to Garden Friday.
Each week, we share what's going on in our North Carolina gardens.
There is so much gardening going on right now,
that it may require daily posts to get caught up!
It's ALL GO(O)D!

 
 Last week, we showed you how we created potato towers.
I've gotten feedback on this method,
some folks swear by it, others say they didn't have much success with it.
It's all a great experiment!

seed potatoes

 With the towers in place, it was time to plant the taters.
They were cured for a few days,
which just means that they are left to dry out.
We sliced them in half and placed them on a cookie sheet which was covered with a large rag
and placed them on top of the refrigerator.
The vital step in this process is to make sure that you have at least 3 "eyes" on each piece.
These are the spots where the potato leaves sprout and grow up.


 Our materials were gathered and we headed outside.
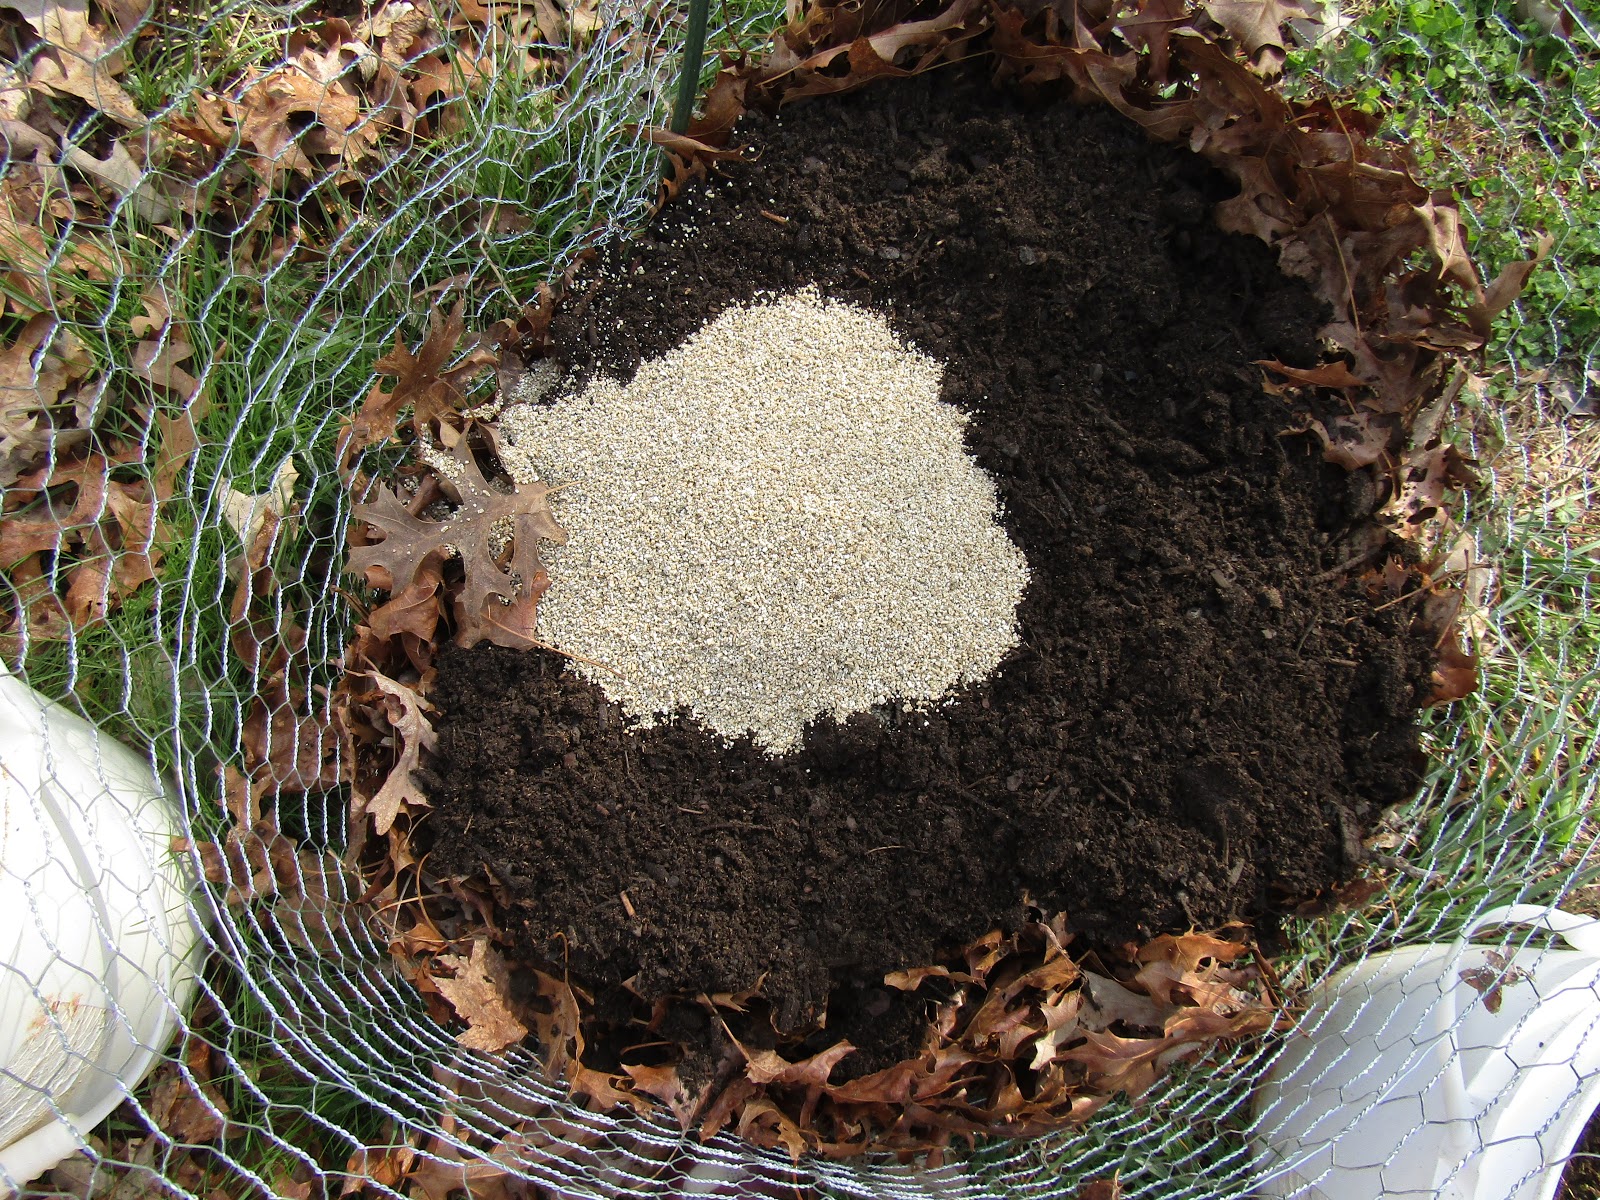
I decided to make things interesting by planting with three different types of fertilzer.


 In all three towers, vermiculite was added to the soil.
This soil is from a big box store and wasn't as loose as I'd like,
so the vermiculite should help with aeration and drainage.


 In the first tower, rabbit poop was added.
I had gotten this supply from a fellow vendor at the 
Mooresville Farmers' Market last season.


 The second tower was fed with compost tea,
made from turkey poop and aged a good, long while.


In the third tower, the turkey poop (Mighty Grow) that I found at Ford's Seeds
(where I also bought the seed potatoes)
was added.  It will be interesting to see if there are any differences in growth.


Each tower got 7 seed potatoes, nestled into the soil and amendments.


 The cut side is placed down against the soil
so that the "eyes" can find the sun.
The spuds were then covered with a layer of soil.
The pinkish bumps can be seen here
and if all goes according to plan,
that's where the leaves start to sprout.


After some heavy rain, I noticed some of the potatoes were peeking out of the soil.
That's a no-no.  Potatoes don't like the sun.
If they are exposed to sun and start to turn green,
they are not fit to eat, and can make a body very ill.
Only the leaves should be showing themselves,
so I added a layer of composted straw to cover them up.
They've been watered each day when we've had no rain.
They will continue to be water only as needed,
and hopefully, soon, we will be seeing some foliage popping up! 
Once the leaves start to head for the sky,
more soil is added, and then more mulch or straw.
This is done a few times until harvest. 


One  astounding discovery was made earlier in the week
as I was adding leaves to the leaf mulch bin.
This pile was already quite large when we bought the house.
We have an abundance of leaves on the property.
I decided to dig into it to see what might be taking up residence there.


Jackpot!
All sorts of wonderful slimy critters were hanging out.
What a goldmine for the garden!
I'll be adding some of these workhorses to the containers
and any beds I may decide to throw together.
They do a fabulous job of composting and adding nutrients to the soil.
There are plans in the works to start a worm bin,
but I guess I have a good running start!


 Although we are still having temperatures overnight in the 30's,
Mother Nature is screaming for spring to begin!
Look at these lovely, delicate Grape Hyacinths (thanks for the i.d., Ben) 
we have speckling our property.
After these have finished blooming,
the plan is to relocate them into some of the established beds,
although these bulbs are fairly easy-going
and can even be transplanted while blooming.


From all accounts, this looks like the foliage of a tulip.
I was thinking maybe they are some sort of parrot tulip,
but now I'm not so sure. 
There is so much to learn about all of these amazing bulbs shooting up.


What a treat to witness all of God's handcrafted wonder.

What's going on in your garden this spring?