Tuesday, June 29, 2021

No Sugar Pumpkin Muffins (cf,df,ef,gf,sf)


Over the past few weeks,
our son C, who has multiple food sensitivities,
has taken himself off of sugar
in an effort to support his gut health.
While I admire his determination to foster good health,
it's been a bit of a challenge finding goodies for him to enjoy.
He also gave up his beloved pumpkin bread  
(which contains sugar) for breakfast,
which he's been making himself for the last few years.
He's been eating apple slices or watermelon as his sweets,
but I wanted to provide more of a treat for breakfast and snacks.


 These muffins are just the ticket.
They are corn, dairy, egg, gluten and sugar free,
which supports his goals.
(He's not allergic to eggs, but this recipe is vegan.)
I found the recipe in the allergy-friendly cookbook
I remember reading this book of recipes many years ago,
when C was just starting his gluten-free journey.
Momma had to learn a new way to bake
and this book helped me along that path.
It was good to revisit the pages and figure out
which things he might like best.
I swapped out maple syrup for the agave,
as I've read some not-so-nice things about it.
I also omitted a couple of ingredients that I didn't have on hand.
They turned out great!
Another resource for maple syrup recipes that I plan to peruse is  
where Michelle shares an array
of maple syrup sweetened concoctions.


For now, this recipe will do just as it is.
I can imagine tweaking it to add fruit, nuts or seeds.
There are limitless possibilities with this basic recipe.
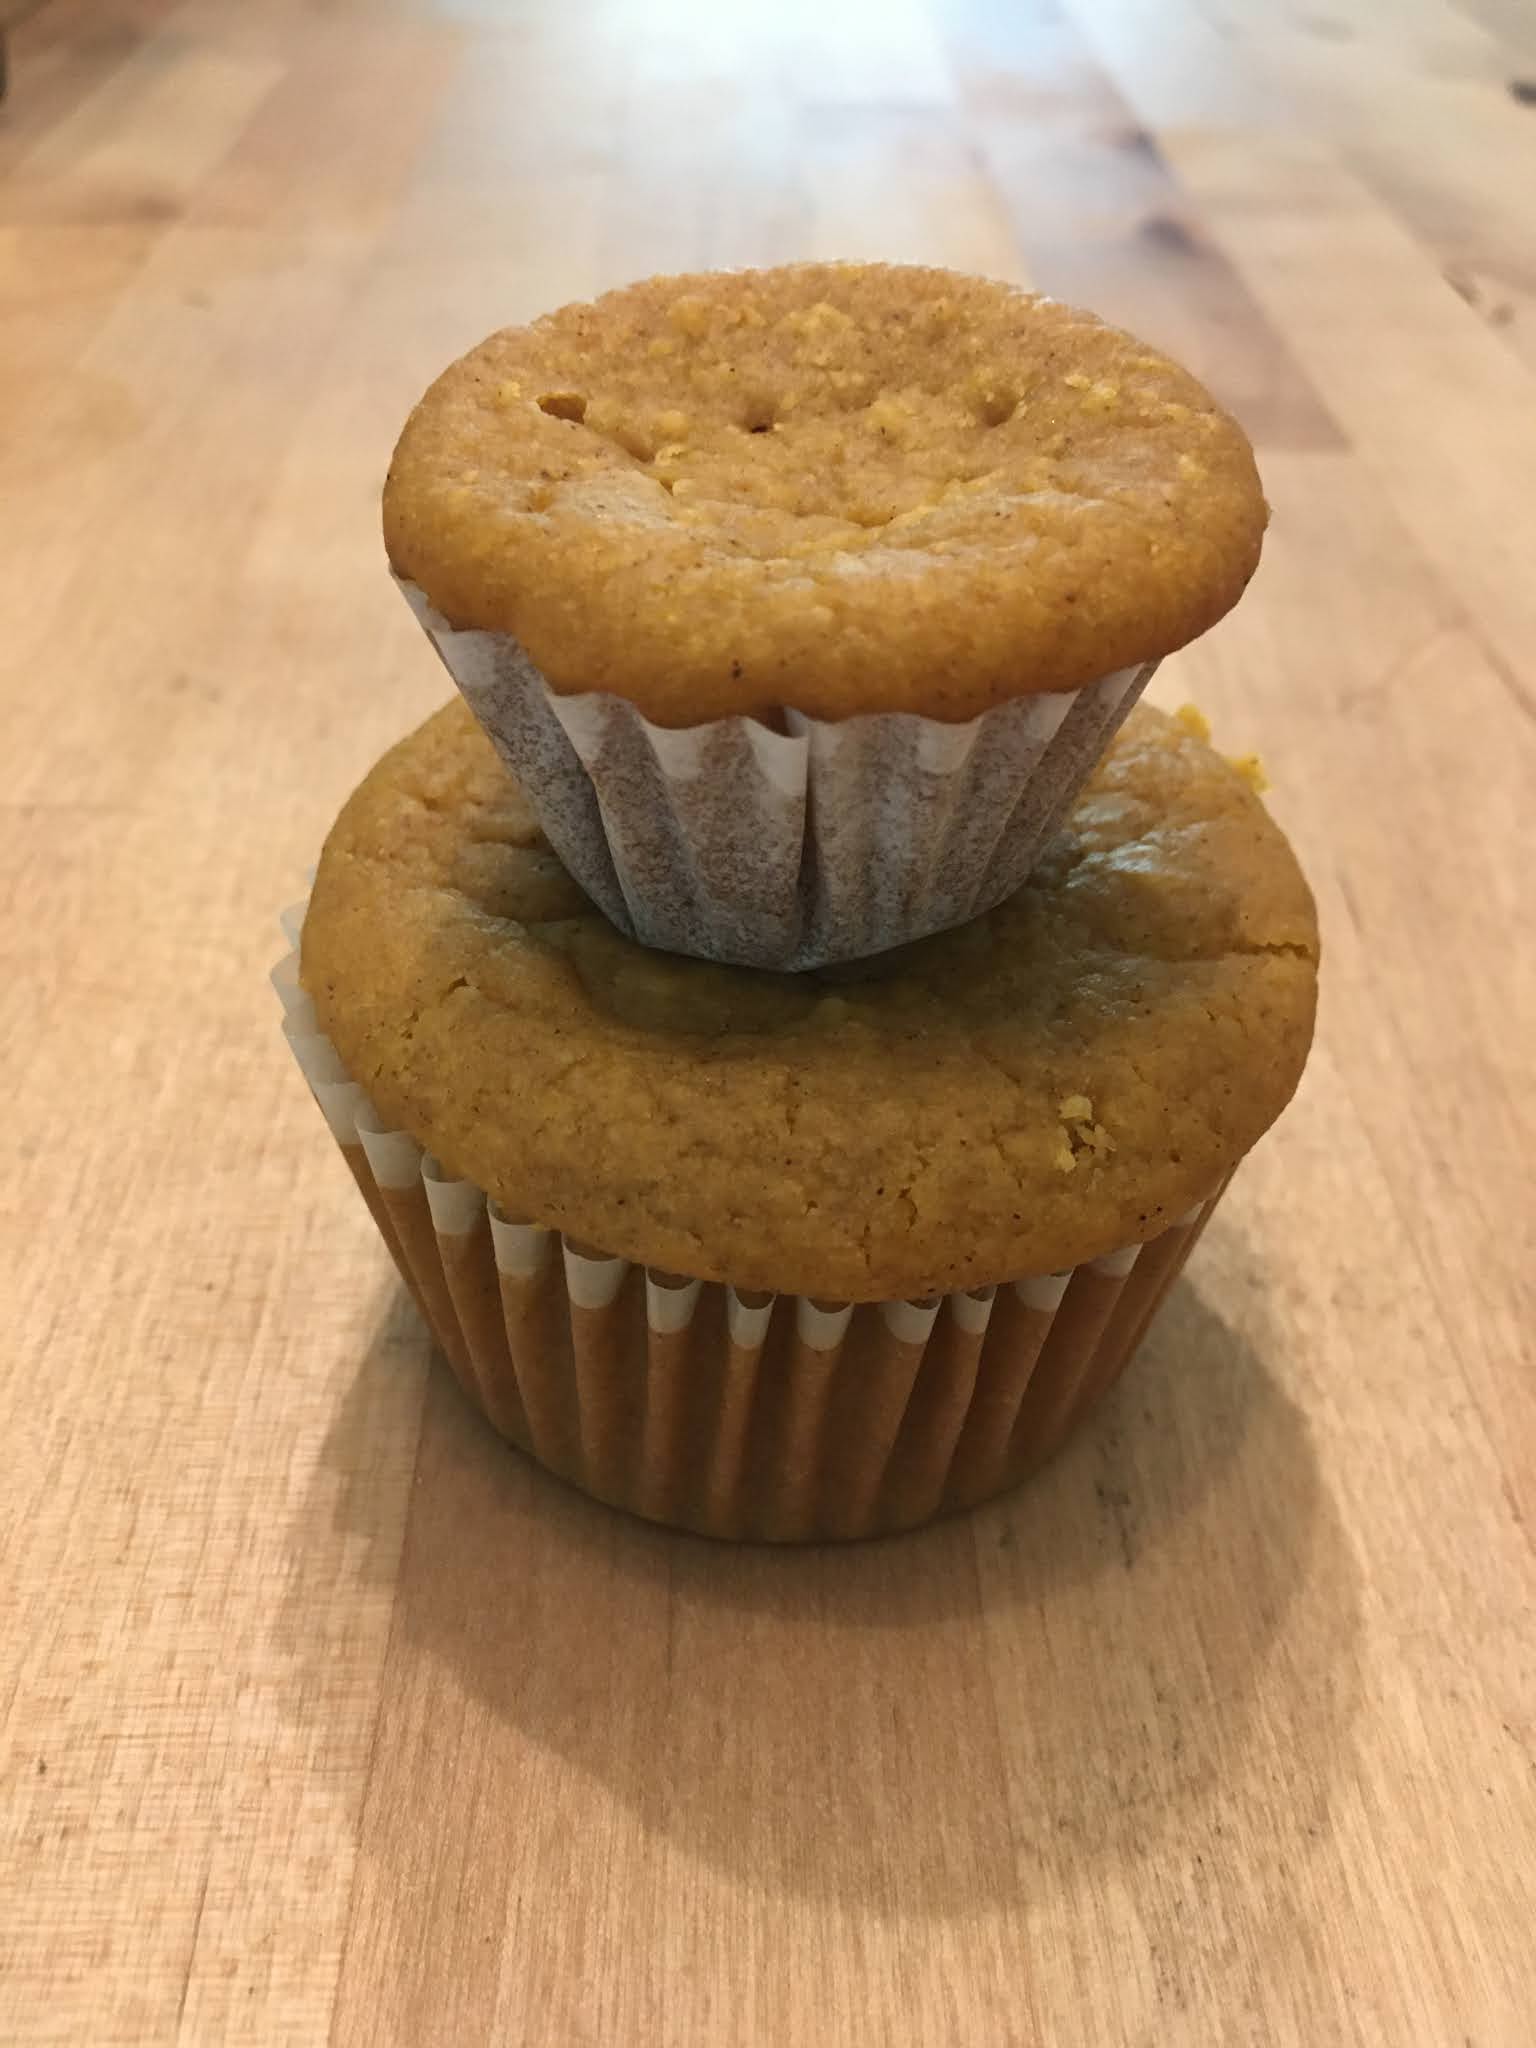
These muffins (or cupcakes), are delightfully moist and flavorful.
The recipe made much more than 12 regular-sized muffins.
In fact, I was able to make over a dozen standard muffins,
as well as 12 mini-muffins.
Here's my version,
although you can find the original recipe here.
Give 'em a go and let me know how you like them.

Babycakes Pumpkin Muffins
2 C gf flour
2 t baking powder
2 t baking soda
1 t salt
1/2 t cinnamon
1/2 C light olive oil
2/3 C maple syrup
2/3 C unsweetened almond milk
2 T vanilla extract
1 1/2 C pumpkin puree
1/2 C hot water

In a large mixing bowl,
combine dry ingredients and whisk to aerate.
Add oil, milk, syrup and vanilla to bowl,
and mix thoroughly.
 Fold in hot water and pumpkin puree.
Preheat oven to 325 degrees and place paper liners in muffin tins.


Place 1/3 cup of batter into each muffin tin and bake 20 minutes,
remembering to turn pan around at the halfway point.
Let cool on wire rack.
Enjoy!

Friday, June 25, 2021

Garden Friday


Welcome to the first Garden Friday of summer!
The garden is bursting with color
and the anticipation of tasty goodies!


There is lettuce ready for the picking
growing in the raised bed with carrots and nasturtiums.
Several varieties of lettuce include buttercrunch, green oakleaf, and rouge.
The nasturtiums are dispersed throughout every bed
as a pest deterrent,
but did you know that both the leaves and flowers are edible?

 
More lettuce shares space in another bed with beets, green beans
and room to reseed two types of peppers.

 
The leek are going to seed and it will be the first time
I will save seed for next year for this crop.
The seed head is absolutely gorgeous.

 
We have a volunteer squash growing in the chicken run.
It looks like it might be a butternut variety,
although they were not planted there last year.
Chalk it up to the bird or squirrel relocation squad.

 
One of the purposely planted squash
is starting to outgrow the bed.
I'm trying to figure out what type of trellis I want to use here.
I will be diligent in checking for squash bugs and eggs.


The sweet potatoes surely seemed to appreciate 
the bit of rain we got this week.
They love the combination of rainfall and the heat of summer.


What a thrill to be able to pick the first blueberries!
I wasn't even sure the plants would ripen this year.
My soil test showed that the soil is not acidic enough,
which is their preferred condition.
The berries were juicy and sweet,
with just a hint of tartness. 
We have several varieties planted,
which we acquired from our local Extension office.

blanket flower

The flowers are also enjoying the warmer temperatures
and modest rainfall.

 
These balloon flowers are doing so much better this year.
I'd say they have gained at least 6 inches on last year's plants.
These beauties come back every spring.

 
The moonflowers are starting their climb on the front porch posts.
These fragrant white blooms open at night,
which is perfect for us front porch sitters.


The pollinator bed near the old garden site has filled in nicely.
Residing here, we have blanket flower, daisies, nasturtiums, pinks, rudebekia
and one very happy gnome.


 It looks like we're in a good position to receive more rain this week.
No complaints from me,
as the garden responds to it like nothing else.
Enjoy some time outside this weekend
and see what Mother Nature has to offer.

Tuesday, June 22, 2021

Garden Buzzzzz!


 One of the intentions of our homestead
is to provide a safe haven for bees and other pollinators.
Along with supplying a water source and a place for raising young,
we aid these vital visitors by offering up an array of nectar sources.
Nectar furnishes pollinators with energy, 
so that they can continue with their valuable work.
 
Here are 8 easy-to-care for perennial plants that will support pollinators in your yard.


Black-eyed Susan- 
This common perennial can be planted in fall 
or early spring and is easily divided.
A show stopping display of blooms
will surely attract all sorts of pollinators to your yard.
The flowers grow on long stems,
which make them ideal for use as cutting flowers.
It prefers full sun and room to stretch out.


butterfly bush-
As the name implies,
this beauty is a favorite for many species of butterflies.
It can get quite large, unless pruned regularly,
and it will fill a space with plentiful blossoms.
It comes back brilliantly each spring after a good pruning.
 

Shasta daisies

daisies-
Daisies are a bit of cheer in the garden,
not only for the gardener, but for the pollinators as well.
They are a favorite of all types of butterflies
and the flat petals make a great landing spot while out foraging.
Daisies return each spring and last up until autumn.
They are one of the best flowers to grow
for cutting and bringing indoors.  


echinacea-
I don't know anyone who doesn't adore coneflowers.
They are a summer staple, popping back up
around the beginning of spring.
With numerous blooms on each plant,
there is ample opportunity for critters to feast.
These come in a wide variety of colors
and are very easy to grow.


Joe Pye weed-
This is one of the best pollinator attractors.
Bees and several types of butterflies enjoy
visiting its blooms.
It can grow to be up to 8 feet tall,
but the one we have in our flower bed
is a dwarf variety, which never exceeds 3 feet high.
The purple flowers show up in late summer,
but last for a few months to enjoy. 


milkweed-
The only host plant for the Monarch butterfly,
this essential plant is a must for every garden.
Each year, we save seeds from the plants we have growing.
We are always looking for full sun areas where
we can plant more so that we can help support 
these fascinating creatures.


salvia (also known as sage)-
This vibrant perennial is one of the most loved plants
by all types of pollinators.
The blooms are prolific, and are constantly covered in bees.
This drought tolerant plant requires very little attention
as long as it gets full sun and room to grow.


yarrow-
With a variety of colors to choose from,
there is sure to be a yarrow you can't live without.
The butterflies and bees swarm this beauty constantly.
Given a spot in full sun,
it will continue to bloom all through the summer.


So, there you have it.
These garden staples are easy to find at nurseries
or quick to grow from seed.
They all require full sun, but very little else.
They are drought tolerant once established
and provide so many critters with food, shelter and protection.
I hope you'll consider adding them to your homestead.
 

Friday, June 18, 2021

Garden Friday On Hiatus


Garden Friday is on hiatus for one more week.
I'll be back home later today,
so we'll have it up and running again next Friday.
Until then,
may your garden be blessed with abundance.

Tuesday, June 15, 2021

"A" Frame Trellis

A few weeks back, I got the idea to find some space 
for some runner beans and cucumbers.
With no more space in the raised beds,
I decided to go UP.
A neighbor had given me some bamboo,
so I fashioned an "A" frame for the beans and cukes to climb.

With just a few materials, I was ready to go.
This was a one-woman project,
although it would be easier with two willing hands.
A sawzall, tape measure, scissors, hammer, baling twine or jute,
and some conduit are all that are needed, along with the bamboo poles.

I first decided where I wanted the frame.
The garden has full sun most of the day,
so I just tucked it in next to one of the raised beds.
After measuring out the distance between the end supports,
I hammered in some pieces of conduit,
which were cut in half to 2 1/2 feet.
The length of the frame will be determined by the length 
of your longest bamboo pole.

The bamboo was slipped over the conduit and tilted toward the center,
so that it could be attached together.
Some of the bamboo was plugged up at the end,
so I just hammered the material out.

Here are the two pieces of conduit in the foreground.
I laid the longest piece of bamboo across the ground
so that I would know where to install the conduit on the other end.
The piece that spans the top should overlap on the sides.


The two end poles are crossed (like an "A") and the baling twine is used
to bind them together.
The longest bamboo pole is then laid across the top between the crossed poles.

Baling twine was again used, this time
tied from the horizontal pole,
to offer a place for the beans and cukes to climb.
Soil was added at the bottom, and the seeds were sown.
I love how much growing space this gives me,
without taking up much room.
I can see another one of these in our future.
Now, let's get growing!
 

Friday, June 11, 2021

Garden Friday or Not


While I’m away from the homestead pup sitting,
I don’t have access to a computer,
and I can’t figure out how to post on my tablet,
so Garden Friday will be taking the week off.
I hope to someday share this lovely veg garden with you.
Hint:  I work here!


Tuesday, June 8, 2021

"Spooning" Onions

 
newly planted onions


This was the first year that I grew onions in earnest.
There's always a learning curve when trying new ventures,
and I'm just beginning to find out what's entailed with growing this crop.
It doesn't require much, but it's satisfying knowing that should I master this crop,
I'll never need to buy onions again.

 
These are the Walla-Walla variety,
which were acquired from Sow True seeds. 
They are a sweet Spanish variety that can be planted
either in the late summer for a June harvest,
or in the early spring for a late summer harvest.
I enjoy growing year-round, so this variety fit right in
with my plans to overwinter a few crops like garlic and leek. 
These seeds were planted in early fall and pretty much
left to their own devices.
I mulched over them with our own leaf mulch
and just checked on them once in a while to see how they were doing.
I didn't know about spooning
which helps the onions grow better.

 
 I've been watching a vlog called,
That 1870's Homestead,
where Rachel talked about
(Click on the link above to watch her video).
It's a new concept to me, but she swears by it.
Instead of allowing the mulch and soil to envelope the bulb,
the soil around the base of the bulb is moved aside,
so that only the roots are buried.
(It has been said that a spoon was used to do this.)
This is supposed to promote a larger bulb.


Although I'm a little late to the party this year,
(what else is new?),
I went ahead and spooned the onions ,
and will keep this in mind for next season when I start anew.
It will be interesting to see if it makes a difference
compared to this year.
 
 
Many of the onions look just fine already,
and I'll harvest the larger ones for processing,
but it will be fun to see if the spooning
will make any difference by the end of the month,
when I will need to harvest them all.
This onion is supposed to be good for storing
for just a few months,
so I may need to research another variety that can be stored long term.

Do you have any experience with onions for long term storage?
Have you heard of spooning?

Friday, June 4, 2021

Garden Friday


Welcome back to Garden Friday,
where we share what's happening on our homestead.
 
Don't you just love echinacea?
This summertime bloomer just fills my heart with joy. 
Here, it happily skirts one of our crape myrtle trees.

 
The front porch is bursting with blooms
including Black-eyed Susans, marigolds, milkweed,
salvia, Shasta daisies, and even some leftover pansies from winter.
We have volunteer milkweed each year springing up in this bed,
and this year I potted some up to give away on Craig's List and Next Door.

 
The pollinator bed near the veg garden is filling in.
The irrigation really makes the difference here.
All of these plants are drought tolerant,
but by keeping them well watered, they really thrive.
There are several sunflowers beginning to make their ascent into the sky.

 
A friend gave me some cardboard, so I used it
to line the sides of the chook run.
It will be covered with mulch, so that weeding won't be necessary.


 A neighbor gave me some bamboo he wasn't using,
and I fashioned an "A-frame" on which to trellis the beans and cucumbers.
The vertical element makes the garden more interesting, no?

 
The strawberries have now been hooked into the irrigation.
They have not produced fruit for a couple of weeks,
so I'm not really sure what's going on with them.

 
These scapes were found on some of the leek and onions,
so I cut them off to use in cooking.
Until I saw these, I had only heard of garlic scapes.
All being in the allium family, I guess it makes perfect sense.

 
Speaking of garlic,
the yearly harvesting of this crop took place earlier in the week.
Although we had a good amount of bulbs,
the size of the bulbs was fairly disappointing.

 
This is what our garlic usually looks like at harvest time,
but we only had a dozen or so that reached this size.
Most are smaller bulbs, and one good thing about that
is that they are easier to fit into the garlic press.
We're happy to have another year's worth of garlic curing in the garage.

 
The sweet potatoes got planted as soon as the garlic was pulled up.
We amended with some compost and worm castings,
then tucked our home-grown slips into the soil.
Having started early enough in the season led to plenty of slips to plant.

 
Just for fun, I also planted two of the potatoes from which we grew the slips
into the raised bed.
It'll be interesting to see how well they grow.
These were organic sweet potatoes I had gotten from our Misfits order.

 
Another two whole potatoes were planted in buckets
right next to the sweet potato bed.
Another experiment, because, why not?

 
The melons are looking mighty sad.
They seem a bit anemic, although they have been fed once already.
This is one crop I try to grow every year, without much success.
I'm not giving up though.
This may be my focus crop next summer.
Each year, I pick a crop to really dial in and learn how to grow well.

 
The onions are looking better.
A few weeks ago I was noting that they had not formed large bulbous shapes,
and this week it seems that they're coming along.
I also learned a secret that I'll share next week
about how to get them to really plump up.

 
We'd gone to the IGA near our house to pick up a few things
and I took the opportunity to purchase a couple of bags of this mix.
I had seen it the last time we were there and thought I'd give it a try.
It's half compost and half cow manure.
I thought it would be the perfect material to try in my flower beds.

 
What great timing on our part!
The day we went, I spent some time browsing their plant selection.
How could I not?
I was hoping to pick up a few things to add to my flower beds.
When I went to check out,
I asked if the plants were discounted,
as they looked a bit peaked.
Unbelievably, the gentleman gave me the whole kit-n-kaboodle!
I sure wished I had filled my cart to the top!

 
 Here's what some of them looked like 
when I took them out of their pots.
Poor souls.
They should be mighty happy once they get to spread out a bit.
I simply cut the bottoms and teased the roots.
 
 
I planted out three bushel baskets with my treasures.
Here are the materials I used to fill up the baskets.


There were enough plants left over from my haul
that I was able to add a few more to several flower beds.
A little goes a long way!


 The volunteer sunflowers (thank you, Mr. Squirrel!)
along the chook run are sizing up, despite the lack of rain.
With any luck at all, we are supposed to be deluged later on
(I'm writing this on Thursday afternoon).
These plants will not only add a bit of cover and shade,
but will supply the chooks with tasty sunflower seeds
(if Mr. Squirrel will share).
 
 
Me and this sweet boy will be spending the next little while together.
I love taking care of him while his folks are away.
I will make an effort to write up a few posts
for the time I'm away from home,
but I make no promises.
If things are quiet here,
we're busy playing.


Here's hoping your garden is blessed with just what it needs.