Thursday, April 30, 2020

Homemade Kraut


One of the goals I've had for the last couple of years
is to improve my gut health.
As I have learned over the many years of
helping C with his gut issues,
there is no substitute for a tip-top microbiome.
A lack of attention to it can cause everything from
behavior issues to allergies, digestive problems and general inflammation in the body.

One way to create and maintain a healthy gut is by eating foods
rich in probiotics.
This would include fermented foods like kefir,
pickled veggies, sauerkraut and yogurt.
The good bacteria and yeast in these food items
help your body to stay balanced and functioning at its peak.


 Lately, it's been fun experimenting with different types of kraut.
The local Cooperative Extension gave a class on fermentation
not long ago, that I was able to attend,
and it got my curiosity going.
Could I really make something like sauerkraut,
which I don't remember ever eating as a kid?
In order to attain the health I desired,
I decided to give it a go.
Over the past month or so, I've been enjoying
not only the preparation and eating of it,
but the results as well.
It's made a world of difference to my health,
leaving me feeling that intentional eating really does have an effect
on my overall health.
It's a good feeling.

Sauerkraut is so easy to make and requires only a few ingredients,
some muscle, and a little bit of time.
Keep in mind that it most likely doesn't taste like
what you can find in the grocery store.
Homemade is always better, IMHO.
What I like about these concoctions,
is that they can be tweaked to your liking.
For instance, I may not get a whole lot of juice
out of the cabbage when massaging it in the bowl,
so I just top it off with a little water when I 
transfer it to the glass jar to ferment.
In this way, it's not as pungent as it might be,
which works for me just fine.
The optional ingredients are up to the maker.
There's really no end to the combinations to be had.
This one's a game changer, folks.


Homemade Sauerkraut

1 medium head of cabbage
(green or red both work fine)
1 1/2 Tablespoons of salt
(kosher, real or sea salt)
water (if desired)
seasonings of choice
(caraway seeds, dill, ginger or anything you like)

1.  Slice cabbage thinly or use the shredding blade on a food processor.
2.  Place cabbage and salt in a large bowl.
3.  Massage for at least 10 minutes, then let sit.
4.  Massage again for 10 minutes, or use a wooden spoon to tamp down.
5.  Add cabbage and seasonings to a clean quart-sized jar.
(I use one fresh from the dishwasher.)
6.  Tamp cabbage down with spoon until it is covered with the juice
that has been extracted from the cabbage.
(If there is not enough juice, simply add water to cover the cabbage.)
7.  Cover jar with a pickle pipe or paper towel square and canning ring.
8.  Let sit at room temperature for 3-14 days,
then taste to see if it's to your liking,
or if it needs more time in the jar.
9.  Refrigerate in the same jar with a lid once it's ready.
Enjoy!


Tuesday, April 28, 2020

Eat Weird Vegetables


"Eat Weird Vegetables" is the tagline for Misfits Market.
This organic only program helps to ensure that "ugly" produce
finds a home in someone's kitchen.

From their website:
"Almost half of all produce harvested in the United States is never eaten. 
 Fruits and vegetables go unpicked in fields or get thrown away at the store, 
simply because they don’t look good.
We're getting ready to receive our third box and I can't wait.


One of the fun things about receiving the delivery every other week,
is not knowing what lies inside the carefully packaged box.
It could be anything in there!
One of the best features about Misfits,
is that they use as little packaging as possible.
The boxes get recycled into our garden walkways
to deter weeds and we save the padding for future mailings of our own.


This was our first order.
We got everything shown here plus a few other goodies.
The green beans and the pears were exceptionally delicious.
It feels so good knowing that it's all organic
and would otherwise go to waste.
I can deal with a few imperfections.


Another box contained Brussels sprouts, collards, kale, 
mango, yellow squash, (and a lot of other gems),
and the most crispy, sweet lil' apples.


Any items I wasn't willing to try or couldn't eat because of allergies 
went to a willing friend, who was more than happy to take them off of my hands.
Most of it has been eaten right here in our kitchen.
For right around $25, we get a great variety of organic produce,
delivered to our door every other week.


There have been a few things that didn't look too good.
It's easy enough to cut around the bad parts
and use up what's left.
I'm not that fussy.

homemade kraut

Misfits Market can be found here.
If you decide to give 'em a go,
feel free to use this discount code to get 25% off your first order.
COOKWME-OQ9HAN
Let me know what you think!

Friday, April 24, 2020

Garden Friday


Welcome back to Garden Friday!
This gorgeous clematis was found in a neighbor's backyard.
It has been enjoying ample sunshine and sporadic rainfall.


This week I took some time to germinate flower seeds
using a paper towel in a repurposed plastic bag.
As you can see, within a week,
we had the beginnings of a colorful pollinator bed.


I much prefer to start my plants from seed.
The fascinating process always leaves me in awe.
With just a bit of water,
(no sun even required),
the seeds burst open to fulfill their purpose.
Amazing!


Many of them ended up in the pollinator bed
we have in the vegetable garden.
This bed is designed to promote pollination
of all of our crops needing their help.
So far, we have sunflowers and a few other 
seedlings coming up that will last throughout the summer.


In the front porch bed,
the purple salvia is about to bloom.
I discovered this plant when we were living in Florida,
and am so happy that I can enjoy it in my NC garden.


Coneflowers are planted all over the property,
but somehow, it still doesn't seem like enough.
One of my favorite blooms,
I can see sowing a lot more of these wherever I can find space.


The milkweed was cut way back in the late fall,
and has decided to come back on its own.
This is the host plant for the Monarch butterfly,
so we look forward to delighting in watching the transformation
from caterpillars to butterflies.
It's magic, I tell ya!


The alyssum has come back on its own as well.
It forms a border in our front porch bed.
The salvia, alyssum, and lantana planted here,
all help to create a blue/purple theme.


My neighbor's peonies are just about to pop.
These plants have amazed me in the past few weeks,
as they seem to grow 6 inches overnight!


In the veggie garden,
the parsley is starting to get some height.
This plant hosts the black swallowtail butterfly,
but so far, no eggs have been spotted under the leaves.
Here's a post from years back 
about the caterpillars we hosted in our Florida yard.


The lettuce seeded a couple of weeks ago is holding its own.
We sowed buttercrunch, and green oakleaf lettuce
as well as scarlet kale.


Coffee cans work well for these shallow-rooted crops.
It looks like the wire covers did the trick
so that critters couldn't dig up the seeds.
Now that they've germinated, the screens come off.


The snap peas are getting a leg up on the arches.
They were planted closer than usual,
and it doesn't seem to have bothered them one bit.


I'm thinking of harvesting some as shoots,
and leaving others to grow for pods.


The potato/onion bed is looking better every day.
When this post was written,
we were in the middle of an all-day rain event,
and when I did a quick check on the garden,
I think I actually saw the potatoes  
s
   m
     i
      l
       i
          n
              g.
There's just nothing like a good rain.


I've been working on ridding the garden area of grassy areas
by adding cardboard which will then be covered
by mulch.
If we don't get a delivery of wood chips via our local tree trimmer,
we are able to acquire them for free from our county landfill.


 More cardboard here will rid us of pesky grass and weeds.
(Have I told you how much I abhor dislike grass
for its water-robbing properties?)
This area is where our newly established asparagus bed
and strawberry tub reside (out of the photo).
The structure at the top of the photo housed our loofah plants
last year, but will this year be the trellis for hyacinth bean.
Maybe.
I'm toying with the idea of growing melons and watermelons on it.
We'll see...


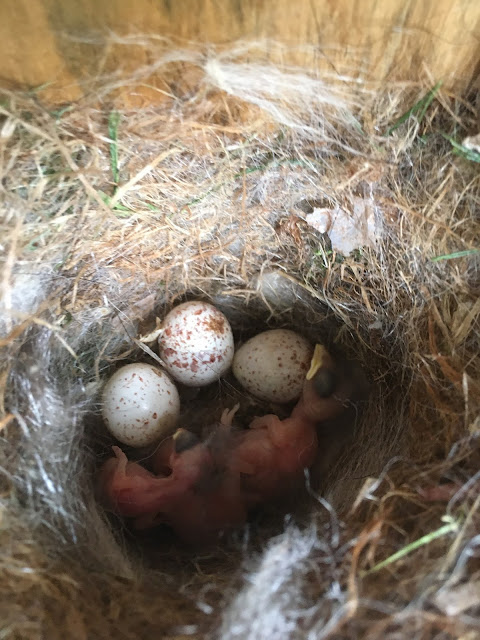
And lookee what I found the other day in one of our birdhouses!
Aren't birds fascinating?!
Just look at that lovely cushy nest.
Who wouldn't want to live there?
 

And inside was an even better surprise!
We believe these to be baby sparrows
and three more siblings yet to come.
Spring is truly a magical time.

How's your garden growing?


Wednesday, April 22, 2020

Earth Day 2020


Happy Earth Day,
My Dear Mother!


"The good man 
is the friend of all living things."
~Mahatma Gandhi

Tuesday, April 21, 2020

Container Planting Strawberries


These two galvanized tins were recently acquired
from a friend who was discarding them.
Metal is one of my favorite things to plant in,
and I knew that I'd come up with a plan for these.


Having purchased strawberry starts from our local
Cooperative Extension's yearly plant sale,
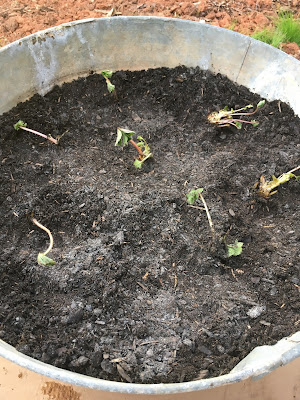
I decided to make the larger tub into a portable 
strawberry bed.
Not being sure where a permanent bed would end up,
this seemed like a golden opportunity to grow them this year,
and take the rest of the season to figure out a better solution.


Although strawberries savor a good dowsing,
they do not like to remain wet,
so drainage is paramount to their health.
A power drill did the trick quick as a wink.


The starts were laid out,
so that I could see how many I had to plant.
By next year, I hope to have some runners from these first starts,
to give us a continual supply of plants.


Containers are one of the best solutions for growing strawberries,
for several reasons.
First of all, they like a particular pH (between 5.5-7),
so being able to control the amendments to aid in that balance
is a bit easier in a container.
Another reason vessels work well are that they can be watered easily.
Once the water runs out the bottom, you know they've had a good drink.
The pots are also easy to keep weed-free, which this crop prefers.
We planted them so that the crowns are above the soil.


Straw or leaves can be added to retain moisture.
Some worm castings or worm tea will be added
every month after flowers appear.
We hope to harvest a bounty of berries
for fresh eating, jams and smoothies.
Once the season is over,
the plants will be covered with straw or leaves
to help them survive the winter cold.

For more information about the growing and care of strawberry plants,
enjoy this website
The Farmers' Almanac is a great go-to guide
for everything gardening.
Get your berries on!