Friday, August 30, 2019

Garden Friday


Yesterday we woke up to 61 degrees,
and enjoyed a cool breeze most of the day.
It seems that fall may be arriving a bit early.
You won't get one complaint from me!


With autumn hinting at staying a while,
it seemed like a great time to do some clean up in the garden.
The ride-on tractor and little trailer are so helpful
and save me lots of steps.


The leaf pile sits in a corner of our side yard
and holds last autumn's bounty.
It breaks down over the year and is then used
to amend the beds.


Leaf mulch tends to attract earthworms and other beneficial organisms,
which will enrich your growing medium.
It can also act as an aerator and balances out the nitrogen in soil.
When grabbing a forkful from our pile,
there were tons of these lil' critters doing their work.


The remainder of any spring/summer veg was pulled from the hugelkultur bed,
except for some leek, basil and nasturtiums.
When I get to planting in earnest,
these can continue growing without being in my way.
The shredded leaves were added to the bed,
along with some fresh soil, compost, and worm castings from our worm bin.


I also decided to remove most of the larger logs from the bottom of the bed.
Since they hadn't broken down that much in a year,
I will save them for future beds that will be a bit deeper.


The whole kit-n-kaboodle was covered with the straw
left over from our potato towers.
It had been sitting for a while, breaking down over time.


This straw was actually the remains of the dismantled straw bales
that I grew lettuce and kale in last year.
It gets recycled as mulch in its final stages
and helps to retain moisture and deter weeds in the growing beds.
The $3 per bale I paid certainly gave me a lot for my money.
With two beds ready to plant,
it was time to get to a few tidying chores.


This compost bin was here when we moved in,
an unexpected treasure!
We use several coffee cans to collect our food scraps (usually kept in the freezer),
which are emptied into a 5-gallon bucket on the back deck.
Once a week or so, we empty the contents of the bucket
into this bin, then add leaves and a bit of compost.
I relocated it closer to the house and took a look at what remained behind.


The pile seemed quite compressed,
with lots of earthworms and other critters enjoying the bottom of the pile.
The top layer still had visible food scraps.


It's always sad to pull up the sunflowers at the end of the summer.
These had been blown over in a fierce wind,
and I couldn't prop them up.
This was a colossal collection of sunflowers,


this one being the tallest, at over 9 feet!


I like to leave them in the garden for as long as possible,
because they act as a food source for birds and pollinators.


Some of the heads were removed and added to the pollinator bed
so that perhaps the birds can still enjoy them.
This bed will be planted with fall blooms
to attract pollinators to the garden.

Black-eyed Susan vine climbing sunflower


This was the first time we've grown watermelon,
and unfortunately, we lost the first one
when it was too heavy for the vine,
(we're growing them vertically),
and it fell down before ripening.


With several more still growing on the arches,
I was hoping to find a solution to save the rest.
I found some rags in the rag bin and cut them into rectangular shapes.


The melons were placed in the slings,
so that the weight of the fruit is displaced,
and hopefully, it can grow to fruition on the vine.


The top was simply tied onto the arches.
I've been checking on them this week,
and so far, they seem to be doing the trick.


 The remainder of the butternut squash was picked,
and it is curing inside for a week or so.
This bed will be the next to be amended,
so that our fall planting can begin in the next two weeks.


 We're still getting a smattering of cucumbers,


while eggplant and okra are coming on strong.
This veg picked a few times a week
promptly makes it onto a sheet pan and is roasted.
So far, one jar of pickled okra has made it into the fridge.
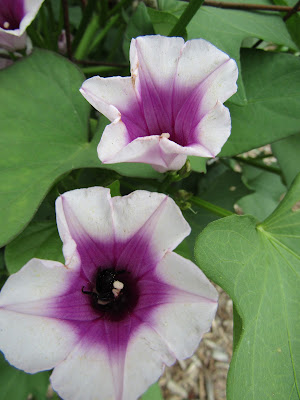
sweet potato blooms


 These were discovered this week, and I am SO excited!
The milkweed we planted is doing well
and is serving as a host to several monarch caterpillars.
We are a Certified Monarch Way Station and are so happy to provide what they need!
What a miraculous transformation!


As summer draws to a close,
we welcome the changes to come
with cooler temperatures, less humidity,
and bugs taking a hiatus for a while.
Gardeners in our area have yet 
another season to look forward to.
What a blessing!


Thursday, August 29, 2019

Let There Be Light!


Our kitchen makeover is nearing its end.
We've shown how we changed out our countertops,
backsplash, sink and island top and surround.
This past weekend we tackled the lighting.
This is the light fixture that was here when we bought the house.


It was adequate,
but wasn't bright enough to my liking,
especially when something needed to be photographed for the blog.
Truth be told, it wasn't our style.


 Originally, I had planned to add commercial whisks,
and figure out how to create lights out of them,
but I had trouble finding them for the price I wanted to pay.
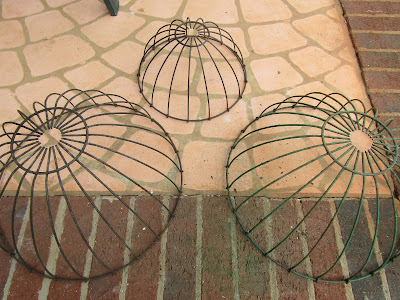
Then I happened upon these wire baskets at a local thrift store.
They seemed perfect for this application,
so I sanded them, and painted them white.
Over the weekend, we went to our big box store 
to look for cabinet knobs and found these...


 which we decided we couldn't live without.
They were a similar idea to the whisks and baskets,
but with the accompanying kits,
we knew we could complete the job ourselves,
without needing to hire an electrician.
Win-win!


Between the two of us,
we managed to take down the old fixture,
and put up the base for the new one.
It was a bit tricky,
as we couldn't get it to sit flat on the ceiling.
But Big K being who he is, figured it out.


The only other important part was figuring out
how low we wanted the lights to hang.
The excess wire was tucked into the base part
and the globes were screwed into the sockets.
We added vintage-looking lightbulbs,
and we were in business.
So easy!


The other light we changed out was over our beautiful new apron sink.
It was a recessed light,
which was so far away from the sink area,
that it didn't do much good.


 Now with the light a little closer to the action,
it's so much easier to see what you're doing.


 The kitchen is brighter and fresher and the place I want to be.
Even if I'm not cooking,
I feel so comfortable hanging out in the space we've created.


The kitchen really is the heart of the home,
and with this update project almost complete,
it'll stay that way a good, long time.

Tuesday, August 27, 2019

Planting Straw Bales


A couple of years ago,
I discovered straw bale gardening.
Intrigued, I checked this book out of the library
to find out more.
Being the experimental gardener that I am,
I decided to give it a go.


There are several reasons why folks might utilize straw bales to grow:
1.  Not enough space in which to grow
2.  Poor or lack of soil in their location
3.  Mobility issues with bending down
4.  Living in a rental or temporary place

Although we do have poor clay soil on our homestead,
the other issues don't really apply to our situation.
I just thought it sounded like something neat to try.
I enjoy challenging myself to pursue new things.


Last year we had some success.
We grew mostly kale and lettuces in them.
In fact, anything other than root crops do fairly well.
The bales are saturated with water
(you can add fertilizer sporadically as well)
for 10-14 days,
and then they are ready to go.
A good, loose potting mix can be added to the top of the bales,
and seeds added according to their proper depth requirements.


The other option is to use transplants that you've grown or bought.
Creating a planting hole in the bale, 
the transplant is simply placed in the hole
with compost or potting mix.
That's it!
I've found that the bales actually retain moisture quite well,
so watering is not needed as often as say, containers.
Of course, anytime you plant seeds they must be kept moist until germination,
and seedlings need to be watched early on to coddle them a bit.
Soaker hoses are a good option for those who have a nearby spigot.
Drip irrigation would be even easier, if it's available.
I ended up watering by hand with very little trouble.


This year I cheated a bit on the "conditioning" aspect.
I didn't fertilize the bales at all before planting,
just went ahead and added my transplants
after watering them for a week or so.
They've done fine.
The first fertilizing is done when the crops develop flowers,
and then every month or so.
I can't even say I'm that diligent about fertilizing,
but my plants seem very forgiving.


okra

This season, we've grown cucumbers, eggplant, okra and strawberries in the bales.
With a few open spots for fall planting,
I'll be adding broccoli, kale and Brussels sprouts to the mix.


Even flowers do well in the bales.
Look at how happy this Black-eyed Susan vine is to envelope them.

We've secured a dozen or so bales for the spring
from a fella who lives less than 5 miles away.
He charges only $3 a bale for organic straw
because it's what he has left over 
and he needs the space for other things.
The bonus is that the bales that break down this fall and winter
will become mulch for beds in the spring.
They are also a great addition to the compost pile.
Then we'll start again with fresh bales for our springtime garden.
We love to recycle any way we can.


I hope you'll consider straw bale gardening.
It's a lot of fun and can enrich your gardening experience.
Get your bale on!

Friday, August 23, 2019

Garden Friday


 It's Garden Friday here in the Piedmont!
Here's what we have growing.


The orange sweet potatoes are starting to climb the arches.
With today's expected rain,
they may be able to get some size to 'em. 


The white sweet potatoes are outgrowing their raised bed
and are loaded with blooms.
I still haven't figured out why these are doing so much better
than their cousins.


 The arches are starting to fill in
with melons and beans.
I love the shade it creates and the dramatic effect
serves as a great focal point.


We have a few melons getting bigger every day.
I found one that had fallen off the wire trellis,
so I'll have to fashion some slings so that we don't lose any more.


No support needed for the loofahs.
They gladly dangle from the vines,
even though they are gigantic.


 This one turned out to be an unusual shape,
 I think it got tangled up in some of the vines.


 The first loofah we discovered on the trellis was picked
when it began turning yellow.
We're gonna let it dry out
and then peel the skin off.
This crop has been a blast to grow.


We're getting a steady stream of okra now,
with some planted in our raised rows
and a couple nesting in the straw bales.
This year I've been roasting it along with my other veg,
but I'm going to try to save some for pickling
so that I can enjoy it the rest of the year.

okra blossom


The first butternut squash was picked
and it is curing for a week or so.
I found out that one of the ways to determine if they are ready to harvest
is that the stem begins to turn brown.
Most of these are ripening at the same time,
so they will have to be harvested and stored
or given away to friends and neighbors.


 The first eggplant of the season was picked yesterday...


 and I can't wait to roast it along with some other goodies.


I'm not too sure about growing pumpkin.
It's not apparent what it needs,
but I suspect it's not getting enough water.
I'll keep at it, and hope for the best.


 I must be more diligent about getting rid of these eggs,
which make themselves at home on the squash leaves.
They are definitely not helping my production.


C found this curious critter on the front window yesterday
and it stayed there almost all day long.
Looks like a leaf, doesn't it?
Mother Nature has some fabulous disguises!


We're hoping we get a deluge today,
so that hand watering will not be necessary.
It's a small price to pay though,
for the bounty the garden gifts us with.

What are you harvesting this summer?