
We are continuing to tackle a few small projects
in our quest to create a welcoming space in our new home.
in our quest to create a welcoming space in our new home.
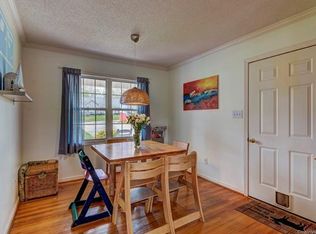
The former owners used this room off the garage as a dining space.
The light fixture was in the middle of the room and hung low
so that it could work over the dining table.
For us, the room is serving double-duty as an office
and eating area.
We haven't yet decided if these changes will be permanent or not,
as we've only been in the house for a month.
It's a good idea to live in the space for a while,
so you can see how it best suits your family's needs.

As cute as it is, we knew we didn't want this light in the center of the room
and we needed a fan here, as it sits adjacent to the kitchen.
Big K has added fans to each bedroom
and this was the final one to be installed.
We wanted to show you just how easy it is
to change out fixtures.

The fan comes in several pieces and has an instruction booklet,
to make it easy for do-it-yourselfers.
All of the fans we chose have a brushed nickel finish,
as that is what we are using throughout the house.

Once the light came down,
we were left with these protruding wires.

The fan base plate is secured with a few screws.
The wires get threaded through a hole in the plate.
Big K is lovin' his new drill!

These wires get matched up to the same colored wires
that come with the fan.
Wire nuts keep everything secured.
Just match up the same colored wires, twist them a couple of times to keep them together,
and then put them into the wire nut and twist a couple of times around.

This handy hook allows the installer to hang the fan
while working on the wiring.
It fits into one of the holes on the fan body.

See the blue wire nuts in place?
The wires then get tucked into this space
so that the body can be aligned with the screws that suspend it.

Once the body is aligned with the four screws,
they are secured with a screwdriver or drill.
Tighten only until the fan body is stable.
It shouldn't wobble or vibrate at all.

The ring then just snaps in place to hide the screw holes.

Here's the part where the blade assembly fits onto.

These wires are for the light on the fan.
The wires are color-matched and simply plug together.
They fit easily into the recessed cavity that you see in the preceding picture.

The fan/light assembly snaps onto the body
and is fastened with four more screws.
and is fastened with four more screws.
The glass for the light snaps into the bottom of the fan,
and you're good to go.

The directions seem straightforward enough
that even if Big K wasn't the handyman extraordinaire,
I might even attempt it myself.
Fortunately, he is employed here full-time,
and we plan to keep him busy for a good, long time.
All the fans look great,
(can I just say that ceiling fans have come a long way?),
and are keeping us cool during this dreadfully hot summer.
One project down,
a few dozen more to go!

No comments:
Post a Comment
Thanks for taking the time to leave your thoughts!