Friday, August 21, 2020

Garden Friday


     Welcome to Garden Friday!

We are in the midst of rebuilding our veggie garden.

The photo above shows what it looked like just a few months ago.       

This shot was taken yesterday.

I've been working on getting most of the tear out done

to enable the leach field to work properly for our septic system.

You can read the back story here.

The arches will be moved by the weekend,

and the old chicken coop will be listed for sale.

Read about our new chicken coop here.


It's been a slow process, which is why I actually took this week off from work.

The first step was to remove the layers of bark mulch.

I added it to the pathway in the back of the house.


This used to be our watermelon patch.

We will definitely be planting this again next year.

Just look at those roots!


I have to admit, tearing out the newly planted asparagus hurt.

I know Cooperative Extension usually offers it for sale in the spring

during their annual plant sale.

This will be on the list.


The soil that was in the beds was removed,


and placed in a pile to be used only for ornamentals.

There's just no way of knowing if it was contaminated,

so it can't be used for growing food.


Before all of the boxes were cleaned out,

the girls decided to do some digging for treats.


The beds have been taken apart, and thankfully,

can be reused in the new location.


We did get some good news from the septic company,

who came by to give us an estimate on some work that needs to be done.

Since the pipes in the leach field were buried so deeply,

there's not much chance that the adjoining sloped area

will have any problems.

Originally, I was planning to use pallets to keep my containers off the ground,

and only grow in pots, thereby ruling out any fear of contamination.

Reassured by the experts, I know that I can safely grow in my raised beds.


With a new focus on the fall garden,

I resowed all of the crops that had not germinated.

Thankfully, we have lots of goodies coming up in our toilet paper roll "pots".


The chooks got moved to a new spot as well

and seem to be enjoying their new digs.

I can't tell you what a thrill it is to head out there at dusk,

and see them all tucked in and ready for bed.

They have been foraging every morning while I've been working on the garden.

They have brought so much purpose to my life

and solidify my belief in the homesteading lifestyle.


It only took them a couple of days to figure this treat container out.

They peck at the sides and the slits release sunflower seeds.


This trellis needs to be moved,

but I'm hesitant as the hyacinth bean has just started to bloom.


I'd love to see it covered in these gorgeous orchid-like blossoms.
We will rise again!


I adore this photo that my sister took of me.

It was taken before the squirrels decimated our sunflowers.

Just like those beautiful flowers,

our new garden will thrive and grow gangbusters!

You can count on that.

(I have no idea why the new blogger format spaces out my sentences.

If you can help me fix this, I would appreciate it.)


Thursday, August 20, 2020

Birdhouse Perch


This spring we put up several birdhouses, in part,
 to help with insect control in the garden.
Some were attached to trees, 
while a couple of others were mounted on 5-foot conduit poles.
The occupancy was hit-and-miss until we discovered a different way
to keep the birds and the eggs inside a bit safer.
We swapped out the five foot poles for 10 foot lengths of conduit.
This makes it more difficult for snakes and squirrels to rob the nests.
It also allows our feathered friends to have more privacy,
without being disturbed by foot traffic passing by at (our) eye level.


The poles slip easily into a simple bracket
and hold the birdhouse in place.
Using a piece of wood or a screw on the top,
the pole stays right where you want it.
This also makes it a breeze to clean the houses out each season,
as the pole handily slides right out of the bracket
after bringing the pole down from its roost.


We used both PVC pipe and plain rebar inserted into the ground
to anchor the poles.
Even in our hard, clay soil, this was readily accomplished.
With the PVC, the pole fits snugly inside,
and with the rebar, the pole drapes over the top.
Either way, it is quite secure.
We used what we had lying around,
but even if the items need to be purchased,
it's fairly inexpensive.


Bird watching has become a daily pasttime,
so it is our pleasure to provide for the families who call our property home.
It's one small thing we can do to encourage and foster
some of Nature's most fascinating creatures.


Tuesday, August 18, 2020

Birthday Bliss!


Sunday was my birthday, a milestone for sure.
This year, I bought myself a gift.
Now, anyone who knows me, knows I'm not into clothes or jewelry,
and I already own my dream car, Ginger.
So, what could I possibly wish for?
 

Why, an eglu cube chicken coop, of course!

 
It arrived just two days after I had ordered it,
which was perfect timing, as I had the weekend off to put it together.


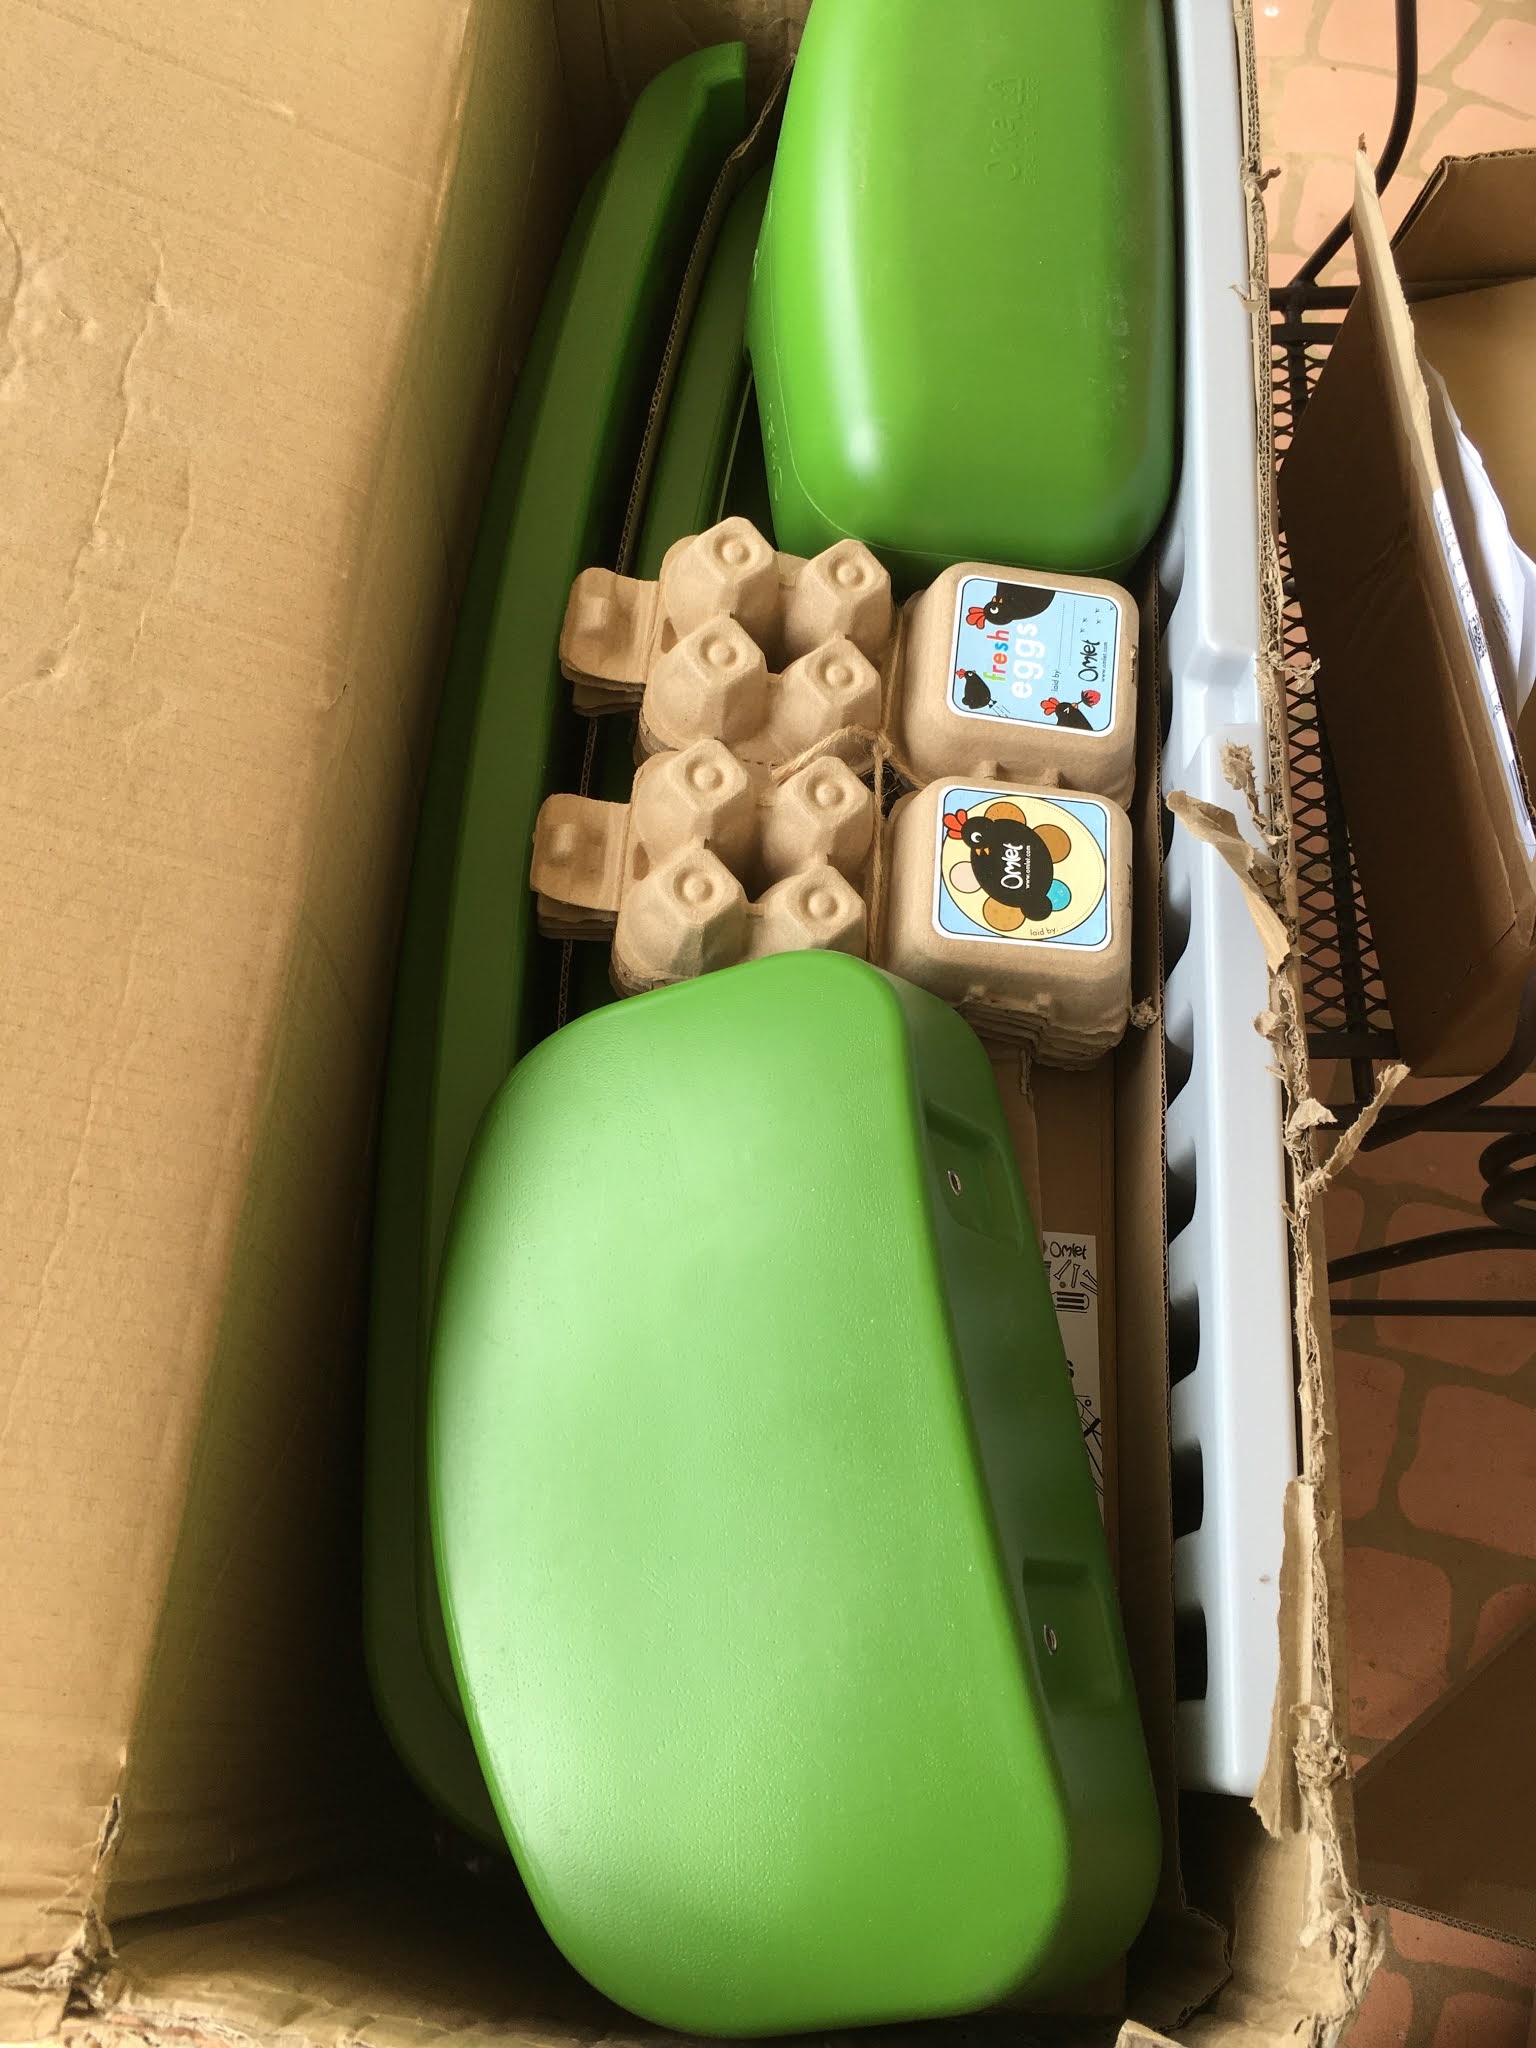
It came in several boxes, 
and packed well without a lot of extraneous packing material.
I like that.
Look at these adorable egg crates that came with the order.

 
With Big K standing by, 
I decided I wanted to try to tackle the assembly by myself.
I, unlike most men, do read directions,
but I still needed a little bit of help from my super-duper handyman.

 
The metal frame allows the coop to sit up off the ground,
which not only gives the chooks a shady spot underneath,
but makes it easier to retrieve eggs and clean the coop.


This side of the coop has a door to the nesting boxes,
making egg retrieval easier.
There is even an interior door which can be closed at night,
so that the chooks don't sleep there.
This keeps the nesting boxes clean when the girls do their magic!


So far, so good!


The nesting box area is on the left while the right side
is designated for their evening roosting.
The green tray underneath the roosting area
slides out for easy emptying of the shavings and prized chicken poop.
I've started a separate compost pile for the shavings 
so that it can be added to the spring garden.


Thankfully, once assembled, it fit perfectly on our lawn trailer,
and we were able to transport it to its resting place.


The side yard is fairly sloped,
so I leveled it as best I could.
With the shavings in place for the girls,
it was ready to go.


The beauty of this coop is that it is mobile.  
I will most likely be getting the wheel attachments,
so that I can move it about on the property as often as I like.
Another fabulous feature is the ease with which it is maintained.
I'm not a fan of plastic, but this coop will actually keep the chooks healthier
because mites have no place to hide, unlike in wooden coops.
The only drawback that I've seen so far (aside from the price),
is the ladder.  They don't seem to know how to exit and enter easily.
I imagine they'll get the hang of it.
 
 
 I've ordered the run that attaches to the coop,
but for now I'm using some mobile netting to keep them in one spot.
It's been wonderful letting them free range during the day,
but I only feel comfortable doing this when I am out there working.
We have dogs who run loose and hawks overhead,
so I like to be able to keep an eye on them while they are grazing.

Going into my 60's as a chicken keeper is a good move.
The feeling of camaraderie with these creatures helps me feel
that I am continuing on my path.
We are both doing our part in this endeavor.
I feed them, they feed us.
It's a win-win,
and one of the best choices I've ever made.
 

Friday, August 7, 2020

Garden Friday

Welcome to our first August edition of Garden Friday.
Over the next few months,
we hope to work on our goals for the new garden location,
(read why we need to move it here),
and create a separate chicken garden area.

As for the existing garden,
it's pretty much been left to fend for itself.
Between getting the news about the drain field,
and then being away at a dog-sitting job for a week,
it's been on the back burner for a while.
The okra is a testament to how neglected its been.


This Bradford family variety still tastes good,
even at this size,
but unfortunately,
we won't be able to eat anything from the garden this year.
The volunteer cantaloupe I found in the huglekulture bed
is massive.
Although we won't be enjoying it,
it gives me motivation to plant this crop again next season.

Someone is enjoying the cantaloupe out there
(pesky squirrels).
Another success this summer is the watermelons.
These are the biggest watermelons I've ever grown.

Again, we won't be able to savor them this year,
but they will be on my planting list next year.
These were both sown in straw bales and left to sprawl.
Not one to give up on the dream of a fall garden,
I've pulled my seeds out and used these homemade pots
to sow a few things.
There's just nothing like the thrill of planting new seeds,
except maybe for the sight of them germinating!
I'm intending to grow beets, broccoli, carrots, chard,
kale, leek, lettuce, onions, and spinach.
Of course, I have a whole bed reserved for planting our garlic.
The plan is to use containers on top of pallets as a temporary measure.
I'll be working on obtaining free 5-gallon buckets and pallets
wherever I can to move forward.
When the weather cools off, I'll take on the task of
relocating beds in the new spot to be ready for spring planting.


The other major change on the homestead will be
turning this area of our side yard
into a chicken garden!
I have so many ideas for this area,
but of course I'm trying to figure out ways to do it on the cheap.

I want to set up some cattle panel arches
so that the chooks have some protection from the weather.
This will also serve as a place to keep their feed and other necessary items.
The idea is to fashion a garden where they can explore, forage for bugs,
hide if need be, take dust baths, and enjoy their "chickeness".
A talented friend is helping me with plant selection,
so that I can create a place they love to roam.
I'm hoping to build an adjoining compost area out of pallets,
to make it easy to add the chickens' bedding to the pile
so that it can sit a good, long time before adding it to the veggie beds.

So far, they are doing well and seem to feel fairly comfortable in their new home.
We recently got this mobile fencing
that can be moved wherever we want them to forage.
I have to say that I didn't think I would enjoy them as much as I do.
It just feels right.
This was our first dozen eggs from the girls!
We have one rooster and three hens,
but we are picking up two more hens this weekend.
"I think this is the beginning of a beautiful friendship."


Tuesday, August 4, 2020

Keeping Watermelon Fresh


Happy Birthday Big K!
We are SO glad you were born.
(Barack, you too!)


It's the heart of melon time and we've been doing our part
to support watermelon farmers.
We all love it and it's one of the best ways to cool down.
We usually buy the larger melons and have enough to share with neighbors.
Once the melon gets cut up,
it doesn't last that long in the fridge.
How does one keep it from getting soggy and water-logged?


 There's probably a gizmo that can be bought,
but I came up with my own solution.
I simply cut up some small containers that were going to be recycled.


They were placed in the bottom of a quart-sized jar.
I like to cube up and store our melon in jars,
so that we can see how much we have left.
(I prefer glass jars for most things, in fact,
and if I can figure out how to substitute using even this bit of plastic, I will.
Like many folks, we are working on decreasing our dependence on plastic.)


 The cut plastic pieces were placed in the bottom of the jar,
snug enough to cause the middle part to be raised just a bit.
(This idea is similar to the little plastic disk
that keeps the pizza from sticking to the top of the box.)


 With the melon on top of the "bridge",
the liquid can drain to the bottom of the jar,
keeping the watermelon on top crisp and juicy.
This has made our melon last longer,
so that we can actually finish the whole thing!
This can be used with other melons too.


The chooks get the rinds,
but they don't need any gizmos.
They eat it up so fast, it doesn't have a chance to get soggy!

In case you do have more watermelon than you can eat,
try this delicious and refreshing drink:

Watermelon Lemonade

8 C watermelon
1/2 C lemon juice
1/2 C sugar (or honey)
2 C water

Add the watermelon to a blender
or food processor and whiz until liquified.
Strain with a sieve.
Add all ingredients to jar or juice container.
Mix well.


What's your favorite type of summer melon?

Here's a past post about cutting up watermelon: