Friday, September 25, 2020

Garden Friday


It's the first official Garden Friday of autumn!
Welcome to our humble homestead.
Recently, I had found this chrysalis hanging on a blade of fountain grass.
Yesterday, when I checked on it again
this was the sight that awaited me.
C and I moved the pot underneath the eaves,
as the weather was predicted to get even rainier,
and it looked like it wasn't yet ready to fly.
It must have eventually dried its wings enough,
because by suppertime, it was gone.
Have a beautiful life, you amazing thing you.

 
This week I found myself at Lowe's drooling over the pansies.
I love this time of year when I can replace the faded flowers
and add this vibrant pop of color everywhere.
The front porch beds have been filled and our mailbox planter
has been planted with a smattering of these beauties.
I may have gone overboard and bought a few too many,
but there is always a neighbor with whom to share
a few extra blooms.

 
The snap peas are looking good,
and with yesterday's (and today's) rainfall,
they should be mighty happy to climb the cattle panel.

 
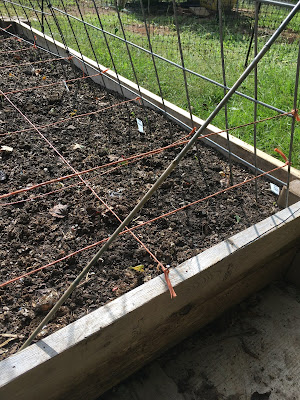
The three 3X4 beds were put together this week
and divided up using baling twine that came from straw bales.
I inserted nails every foot and stretched the baling twine across the beds,
both vertically and horizontally.
This not only keeps my planting area defined,
but acts as a bit of a chicken-proofer to keep them out of the beds.
Taking advantage of a cool evening, sowing was done in the 3 new beds,
as well as the 3X8 bed already in place.

 
It feels good knowing I have most of the fall crops in.
I still plan to sow some containers,
and will try to get to that by this weekend.
I'll just slide in my self-imposed deadline of 
having the fall garden planted by October 1st.

 
The new boxes contain beets, broccoli, cabbage, chard, kale, 
leek, lettuce, parsley, spinach, and tat soi.

 
In the space that used to be the garden,
we decided to overseed with White Dutch Clover.
This will be a pollinator haven and may give the chooks
some extra foraging space.
We also have a lot of wild rabbits in the neighborhood
who will no doubt find it enticing.
Another purpose for the ground cover
is to help absorb moisture, as this is our drain field.


It's coming in nicely with very little effort from me.
I simply spread the seed by hand and let the rain do the rest.

 
This black-eyed Susan vine is a volunteer that is spreading nearby.
It was originally planted in straw bales,
when we had some veg growing in them as well.
It'll make a gorgeous ground cover and be another way
to attract pollinators to our yard.

 
The tithonia is starting to take off and we're lovin' it!
This is one of my all-time favorite blooms.
It germinates easily, has abundant blossoms
and stays around for a good, long while.
Our summer and fall garden will never be without it.
 
With most of the bigger garden projects completed,
it's time to focus on mulching the garden
and getting the irrigation installed.
There is always something to do!


Thursday, September 24, 2020

Oatmeal Pancakes (gf,df,ef,sf)


These pancakes were enjoyed this past weekend
and I have to say that they are keepers!
The fixin's are all real ingredients,
and they couldn't be more allergy-friendly.
I added an egg, but that is totally optional,
if you're keen on keeping them vegan.
These pancakes lend themselves well to
adding in all sorts of extras.
Try:
blueberries
chocolate chips
cinnamon
nuts
 toasted coconut flakes
or whatever floats your boat!
 

The texture of these fantastic flapjacks is so different
than any other I've ever made, in a good way.
I think I'm just diggin' all things oatmeal lately.
Grateful to Dana at Minimalist Baker
for coming up with another winner.
No doubt my freezer will be amply supplied with these
so that I can enjoy them at a moment's notice.


Oatmeal Pancakes
 
1 medium banana
1 1/2 Tablespoon coconut oil
   1 1/2 Tablespoon maple syrup
2 teaspoons baking powder
1/4 teaspoon salt
1 1/4 C milk (plant-based or dairy)
1 egg (optional)
3/4 C oat flour
3/4 C gluten-free flour
1/4 C almond flour
 
Mash bananas in bowl.
Add wet and then dry ingredients, and mix well.
Drop onto cast iron skillet or griddle
(I use a 1/3 C measuring cup)
and cook on one side until bubbles form.
Flip pancakes and cook on remaining side 1 minute.
Makes 20 small pancakes.
Enjoy!
 

Tuesday, September 22, 2020

Easy Cattle Panel Storage

 
 Welcome Autumn!
We are so happy you have come early!
 
my supervisor lending a hand

Since moving the garden over to the side yard,
I've been having to look at all the junk trappings accoutrement
that didn't yet have a home.
It's been on my to-do list for a few weeks now.
A solution was needed quickly,
and this weekend's weather lent itself to the project.
As is my nature,
I wanted to use what was on hand, if possible.


Arches in former garden site
 
Cattle panels are one of my favorite things to repurpose in the garden.
Last year, I used them as trellises in the beds and created a row of arches
on which to grow melons, peas, beans and flowers.


Since we had a couple that were not being used,
it seemed like a good start.
I simply formed an arch
(it's easier to do with help),
and found a spot near the garden where I'd have access to what was needed.

 
Half inch conduit holds it in place
by driving the bottom of the pipe into the soil.


Another repurposed item, baling twine,
holds the tarp on the frame.


The tarp was draped over the frame,
mostly so the items inside are somewhat hidden.
Have I mentioned how much I dislike clutter?
Without the expense of a true shed,
this will provide some outdoor storage space
for garden and chicken materials.

 
A used (free) pallet was placed on the ground,
and a few boards leftover from one of our old raised beds
were used to fashion a floor on which to place things.
The idea is to keep things as dry as possible,
and keep myself from having to step in the mud if it's wet.


For now, I've just stashed everything underneath,
but I'm already tweaking ideas in my head about
how I can make it more stable so that I can hang things up
in order to use more of the vertical space.
I may end up cutting off the horizontal bars at the bottom,
creating spikes that can be driven into the ground.
Another idea is to change the shape to one that's less tall
and more squatty.
Since I'm on the short side, I could still fit underneath 
and maybe have more floor space for goodies.


 I like having everything in one, compact place,
knowing that what I need for the garden and critters
is easily within my reach.


Friday, September 18, 2020

Garden Friday


It's Garden Friday once again!
The weather's been-a-changin' this week
to more autumn-like temperatures.
Yesterday we had a steady day-long rain.
It did the garden good, so no complaints from me.
 
Blue Flag leek
 
Last Tuesday a few crops were planted in our first new bed
of the new veggie garden.
I'm happy to report that the carrots, leek, lettuce and snap peas
have all come up!


 Three additional beds, measuring 3X4, 
were added to the new location.
The idea behind the smaller beds is that they are a bit
easier for someone my size to manage.
I have a difficult time reaching across beds that are much wider.
The same concrete corner pieces were used here,
with boards that were cut for us at the store,
and anchored by rebar through the middle hole of the corners.
It took me only about half an hour to create all three beds.
 
 
With cardboard as the weedblocker in each box,
the insides are filled with branches, twigs and leaves
found on the property.
This fills up the space up to the second board,
while adding organic material to the bed.
 It also saves money by taking up some room in the bed,
so less soil is needed.
As long as there is at least six inches of soil,
most things can be grown quite successfully.
I'm hoping to get these three beds planted this weekend.
 
 
Here's my chook-blocking trick.
So that the chooks will not step into the beds
and possibly damage crops while searching for bugs and worms,
I stretched baling twine through the bed as well as
on the ends and tied it onto the cattle panel.
I also added a small piece of bamboo across the ends,
as an added measure of protection.
We'll see how well it works.

 
More cardboard was laid for grass and weed suppression.
There are three more raised beds to be constructed
and filled on the right side of this picture,
(you can see the flags marking the spots),
but I'm not sure I'll get to it in time to plant.
I'll just keep laying down cardboard as I acquire it,
so that woodchips can be added to the walkways.
I'd like to have a couple of dedicated pollinator beds
in the center between the food beds
as well as some type of vertical element.
It's a work in progress. 
 

We had our neighbor, who is a jack-of-all trades,
cut down this loropetalum bush,
as it was sitting almost directly on top of our septic tank.
It was a bit sad to see it go as the color was spectacular,
and it provided the chooks with ample shade,
but we don't want to create future problems.

 
Grateful for something fun to do while waiting
to get back outside in the garden.
 
May your garden be blessed 
with just the right amount of rain!

Tuesday, September 15, 2020

Easy Compost Bin


 Our compost system seems to keep evolving.
Back in Florida, we did trench composting,
as we lived in a HOA, and couldn't keep a compost pile.
When we moved to our homestead here in NC,
the compost bin (shown above) was left from the previous owners.
We've been using it all along the three plus years we've been here.
Last year, I started an open yard waste pile,
just for branches, prunings, and twigs.
I've wanted to create a larger compost area,
so that eventually, I can supply my own top dressing for the veggie garden.


I toyed with the idea of building a pallet compost system,
but since I would have had to collect more pallets, a new thought came to mind.
Since I already had cattle panels, conduit and chicken wire on hand,
this simple compost bin came to life fairly effortlessly.
It began by cutting one cattle panel in half
and securing it in place with a few pieces of 5 foot pieces of conduit.
 
 
 The saw-zal made quick work of cutting the cattle panel sections.
They come in lengths of 16 feet and are 50 inches wide.
 

 Being a scrapper by nature,
I used these wire ties that I've been saving
from the coffee bags I buy.
They seal the bag shut in case you don't use it all,
and they worked well in this application.


Two were enough to hold the sections together.
I also used these on the arch in the new raised bed.
Worked like a charm! 


The holes on the cattle panel would be large enough to let some of the composted material through,
so I added chicken wire to hold it all in.
I've had a full roll of chicken wire laying around for a while,
so it felt good to use it for something that would get plenty of use.
The easiest way to attach the chicken wire
was to lay the cattle panel on top of it,
cut it to size and then add your ties.
In this way, the weight of the cattle panel
prevents the chicken wire from rolling back on itself.

 
 The way the side portion of the cattle panel was cut
made it easy to run through the back piece.
This helped it slide right in and added a bit of stability.
Since this is the back of the bin,
no need to worry about anyone getting stabbed by the spikes.
I could bend them over if it was a problem,
but there's really no reason for anyone to be behind it.
 
Blood and sweat, but no tears!
 

The bricks were another thing not being used around here,
and they make a great frame for the bin.
The left side of the bin is already being used for the coop shavings,
and we'll add kitchen scraps and yard waste as it accumulates.
Once this side is filled up,
we'll start on the other side.
I can always expand it and add another section
if I feel the need.


I'm pretty stoked about the way the garden is coming together.
It feels good to have created this bin
without the help of YouTube, Pinterest or any living soul.
Maybe I'm getting better at bringing my visions to fruition.
Well, there's a lot more of that to do.
 
What's your favorite way to compost?

Other posts about composting: